


Home Assistant integration for Pluggit ventilation units
Note
This integration is based on the Dantherm integration 👈, as Pluggit and Dantherm ventilation units appear to share the same controller hardware. To avoid maintaining the code in two separate places, most of the code in this repository is copied from the Dantherm integration with each release.

This custom integration requires:
- Home Assistant version 2025.1.0 or newer
Only support for Modbus over TCP/IP.
Known supported units:
- AP190
- AP310
The listed units are known to work with this integration. Basically, all units compatible with the Dantherm Residential or Pluggit iFlow apps should work with the integration as well.
Note
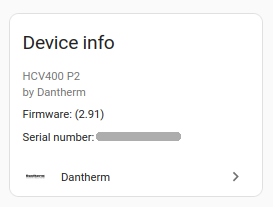
If you have a model not listed and are using this integration, please let me know by posting here. Make sure to include both the model name and the unit type number.
The number can be found in the Device Info section on the integration page; if the unit is not recognized, it will be listed as “Unknown” followed by the number.
| Entity | Description |
|---|---|
alarm_reset |
Clears the active alarm and dismis the alarm notification |
filter_reset |
Resets the filter remain timer and dismis the alarm notification |
| Entity | Description |
|---|---|
calendar |
| Entity | Description |
|---|---|
bypass_damper |
Indicates and controls the manual bypass state of the bypass damper [1] |
| Entity | Description |
|---|---|
boost_mode_timeout |
Sets the duration for Boost Mode before it automatically turns off [3] |
bypass_minimum_temperature |
Minimum outdoor temperature allowed for bypass damper to open [2][5] |
bypass_maximum_temperature |
Maximum outdoor temperature allowed for bypass damper to open [2][5] |
eco_mode_timeout |
Sets the duration for Eco Mode before it automatically deactivates [3] |
filter_lifetime |
Expected lifetime of the filter before triggering a replacement notification [2] |
home_mode_timeout |
Sets how long Home Mode should remain active after being triggered [3] |
manual_bypass_duration |
Duration for which manual bypass remains active after user activation [1][2][5] |
| Entity | Description |
|---|---|
boost_operation_selection |
Defines which mode to apply when Boost Mode is triggered [3] |
default_operation_selection |
|
eco_operation_selection |
Defines which mode to apply when Eco Mode is triggered [3] |
fan_level_selection |
Selects the current fan level (Level 0 to Level 4). Level 0 and Level 4 will timeout after a fixed period. |
home_operation_selection |
Defines which mode to apply when Home Mode is triggered [3] |
operation_selection |
Selects the current mode of operation (Standby, Automatic, Manual, Week Program, Away Mode, Summer Mode, Fireplace Mode and Night Mode). Night Mode is display only. Standby and Fireplace Mode will timeout after a fixed period. |
week_program_selection |
Selects the active predefined week program (Week Program 1 to Week Program 11). Week Program 11 can be user defined but not through the integration. [2] |
| Entity | Description |
|---|---|
air_quality |
Measures air quality if the unit is equipped with a VOC or CO₂ sensor [1] |
air_quality_level |
Indicates the qualitative level of air quality (Clean, Polluted, etc.) [2] |
alarm |
Reports active alarms such as fan or temperature alarms |
exhaust_temperature |
Temperature of indoor air being exhausted after heat recovery |
extract_temperature |
Temperature of indoor air being pulled out for heat recovery |
fan_level |
Current fan level (Level 0 to Level 4) |
fan1_speed |
Actual RPM of fan 1 [2] |
fan2_speed |
Actual RPM of fan 2 [2] |
filter_remain |
Remaining filter life in days |
filter_remain_level |
Qualitative status of remaining filter life (e.g. Good, Replace) [2] |
humidity |
Indoor relative humidity from internal sensor [1] |
humidity_level |
Qualitative level of humidity (e.g. Dry, Normal, Humid) [2] |
adaptive_state |
Shows which adaptive mode (Home, Eco, Boost) is currently active [4] |
internal_preheater_dutycycle |
Percentage of power used by the internal electric preheater [1][2] |
operation_mode |
Current system mode: Automatic, Manual, Week Program, etc. |
outdoor_temperature |
Temperature of fresh outdoor air being pulled in from outside the home |
room_temperature |
Room air temperature from the Pluggit HRC/Pluggit APRC remote [1][2] |
supply_temperature |
Temperature of the supply air delivered to the home |
work_time |
Total operational runtime of the unit [2] |
| Entity | Description |
|---|---|
away_mode |
Enables or disables Away Mode |
boost_mode |
Enables or disables Boost Mode [3] |
disable_bypass |
Forces the bypass damper to remain closed [2] |
eco_mode |
Enables or disables Eco Mode [3] |
fireplace_mode |
Enables Fireplace Mode, increases supply air to compensate for fireplace draft |
home_mode |
Enables or disables Home Mode [3] |
manual_bypass_mode |
Manually activates bypass regardless of conditions [1] |
night_mode |
Enables or disables Night Mode [2] |
sensor_filtering |
Enables or disables sensor value filtering for stability [2] |
summer_mode |
Enables or disables Summer Mode |
| Entity | Description |
|---|---|
night_mode_end_time |
Sets the end time for Night Mode [2] |
night_mode_start_time |
Sets the start time for Night Mode [2] |
[1] The entity may not install due to lack of support or installation in the particular unit.
[2] The entity is disabled by default.
[3] The entity will be enabled or disabled depending on whether the corresponding adaptive trigger is configured.
[4] The entity can only be enabled if any of the adaptive triggers are configured.
[5] The entity may not install due to firmware limitation.
Strikethrough is a work in progress, planned for version 0.5.0.
- Ensure you have HACS installed and configured in your Home Assistant instance.
- Open the HACS (Home Assistant Community Store) by clicking HACS in the side menu.
- Click on Integrations and then click the Explore & Download Repositories button.
- Search for “Pluggit” in the search bar.
- Locate the “Pluggit Integration” repository and click on it.
- Click the Install button.
- Once installed, restart your Home Assistant instance.
- Navigate to your Home Assistant configuration directory.
- For most installations, this will be ‘/config/’.
- Inside the configuration directory, create a new folder named ‘custom_components’ if it does not already exist.
- Inside the ‘custom_components’ folder, create a new folder named ‘pluggit’.
- Download the latest release of the Pluggit integration from the releases page into the ‘custom_components/pluggit’ directory:
- Once the files are in place, restart your Home Assistant instance.
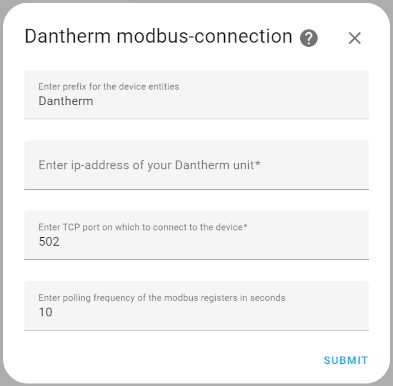
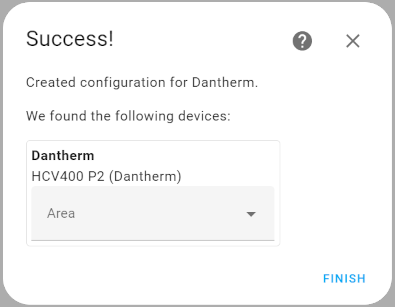
After installation, add the Pluggit integration to your Home Assistant configuration.
- In Home Assistant, go to Configuration > Integrations.
- Click the + button to add a new integration.
- Search for “Pluggit” and select it from the list of available integrations.
- Follow the on-screen instructions to complete the integration setup.


You can open issues directly on this repository. To keep discussions centralized, please refer to the Dantherm Integration here.
Currently supported languages:
Danish, Dutch, English, German and French.
Note
Want to help translate? Grab a language file on GitHub here and post it here. You are also welcome to submit a PR.


Note
The HAC module functions are currently unsupported due to limited testing possibilities. If support for these functions are desired, please contact me for potential collaborative efforts to provide the support.
 The picture elements card has been updated with fresh images and options to include humidity and air quality sensors with changing level icons (2025-6-29).
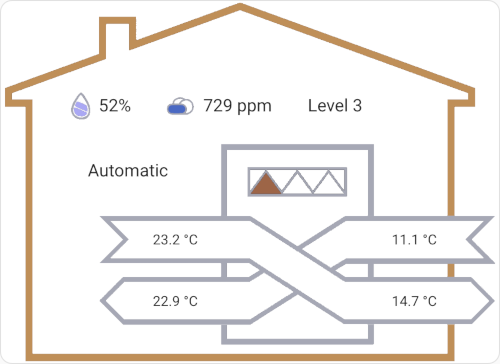
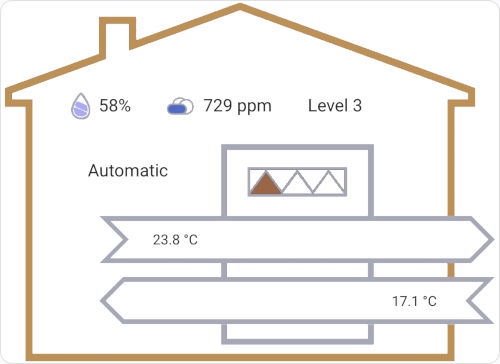
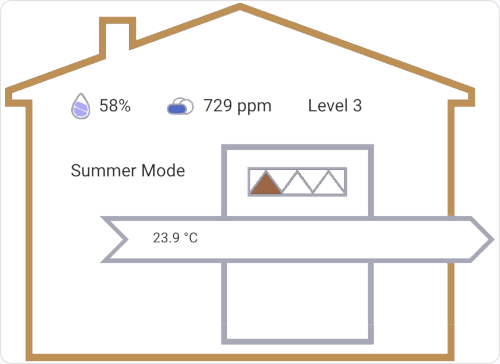
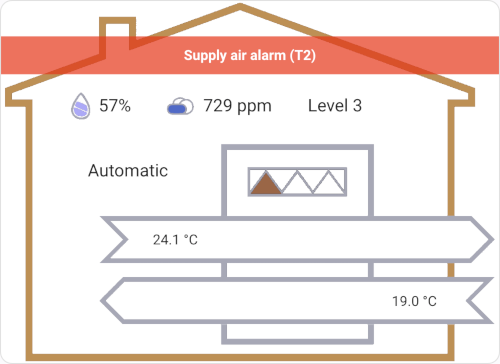
This picture-elements card provides a dynamic and intuitive interface for monitoring and controlling your Pluggit ventilation unit. Designed to resemble the Pluggit app, it visually adapts based on the unit’s bypass state while displaying key real-time data:
- Alarms – Stay alerted to system issues.
- Filter Remaining Level – Easily check when filter replacement is needed.
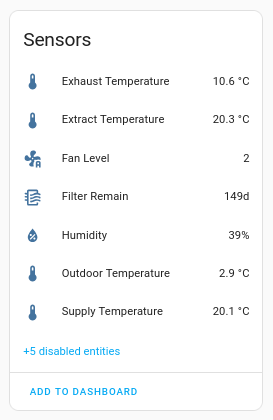
- Ventilation Temperatures – View four key temperature readings: Supply, Extract, Outdoor, and Exhaust.
- Humidity Level – Monitor indoor humidity for optimal air quality.
- Air Quality – Monitor indoor air quality.
Clicking on any displayed entity allows you to adjust its state or explore detailed history graphs for deeper insights.


The details for the above picture-elements card 👈 Click to open
To integrate this into your dashboard, begin by downloading and extracting this zip file. Copy the contained files into the “www” folder within your configuration directory on Home Assistant. You can use the Samba share add-on, the upload feature in the Studio Code Server add-on, or other preferred methods.
Next, insert the following code into your dashboard. If your Home Assistant setup uses a language other than English, make sure to modify the entity names in the code accordingly. You also need to enable the filter_remain_level, humidity_level and air_quality_level sensors if these options are included.
type: picture-elements
image: /local/pluggit1.png
elements:
  - type: image
    entity: sensor.pluggit_filter_remain_level
    state_image:
      "0": /local/pluggit4.png
      "1": /local/pluggit5.png
      "2": /local/pluggit6.png
      "3": /local/pluggit7.png
    style:
      left: 59.5%
      top: 50%
      width: 20.04%
    tap_action:
      action: none
  - type: conditional
    conditions:
      - entity: sensor.pluggit_operation_mode
        state_not: "6"
    elements:
      - type: image
        entity: cover.pluggit_bypass_damper
        state_image:
          closed: /local/pluggit2.png
          closing: /local/pluggit2.png
          open: /local/pluggit3.png
          opening: /local/pluggit3.png
        style:
          left: 59.4%
          top: 74.35%
          width: 79.66%
        tap_action:
          action: more-info
      - type: conditional
        conditions:
          - entity: cover.pluggit_bypass_damper
            state:
              - closed
              - closing
        elements:
          - type: state-label
            entity: sensor.pluggit_outdoor_temperature
            style:
              top: 66%
              left: 83%
          - type: state-label
            entity: sensor.pluggit_extract_temperature
            style:
              top: 66%
              left: 35%
          - type: state-label
            entity: sensor.pluggit_exhaust_temperature
            style:
              top: 83%
              left: 83%
          - type: state-label
            entity: sensor.pluggit_supply_temperature
            style:
              top: 83%
              left: 35%
      - type: conditional
        conditions:
          - entity: cover.pluggit_bypass_damper
            state:
              - open
              - opening
        elements:
          - type: state-label
            entity: sensor.pluggit_extract_temperature
            style:
              top: 66%
              left: 35%
          - type: state-label
            entity: sensor.pluggit_outdoor_temperature
            style:
              top: 83%
              left: 83%
  - type: conditional
    conditions:
      - entity: sensor.pluggit_operation_mode
        state: "6"
    elements:
      - type: image
        image: /local/pluggit8.png
        style:
          left: 59.4%
          top: 74.35%
          width: 79.66%
        tap_action:
          action: none
      - type: state-label
        entity: sensor.pluggit_extract_temperature
        style:
          top: 65.5%
          left: 35%
  - type: conditional
    conditions:
      - entity: sensor.pluggit_alarm
        state_not: "0"
    elements:
      - type: state-label
        entity: sensor.pluggit_alarm
        style:
          top: 15%
          left: 50%
          width: 100%
          font-weight: bold
          text-align: center
          color: white
          background-color: red
          opacity: 70%
  - type: state-label
    entity: select.pluggit_operation_selection
    style:
      top: 47%
      left: 25.5%
      # font-size: 125%
  - type: state-label
    entity: select.pluggit_fan_selection
    style:
      top: 29%
      left: 60%
      # font-size: 125%
      transform: translate(0%,-50%)
#  - type: image
#    entity: sensor.pluggit_humidity_level
#    state_image:
#      "0": /local/pluggit9.png
#      "1": /local/pluggit10.png
#      "2": /local/pluggit11.png
#      "3": /local/pluggit12.png
#    style:
#      top: 29%
#      left: 16%
#      width: 3.76%
#    tap_action:
#      action: none
#  - type: state-label
#    entity: sensor.pluggit_humidity
#    style:
#      top: 29%
#      left: 18%
#      # font-size: 125%
#      transform: translate(0%,-50%)
#  - type: image
#    entity: sensor.pluggit_air_quality_level
#    state_image:
#      "0": /local/pluggit13.png
#      "1": /local/pluggit14.png
#      "2": /local/pluggit15.png
#      "3": /local/pluggit16.png
#    style:
#      top: 29%
#      left: 36%
#      width: 5.45%
#    tap_action:
#      action: none
#  - type: state-label
#    entity: sensor.pluggit_air_quality
#    style:
#      top: 29%
#      left: 39%
#      # font-size: 125%
#      transform: translate(0%,-50%)
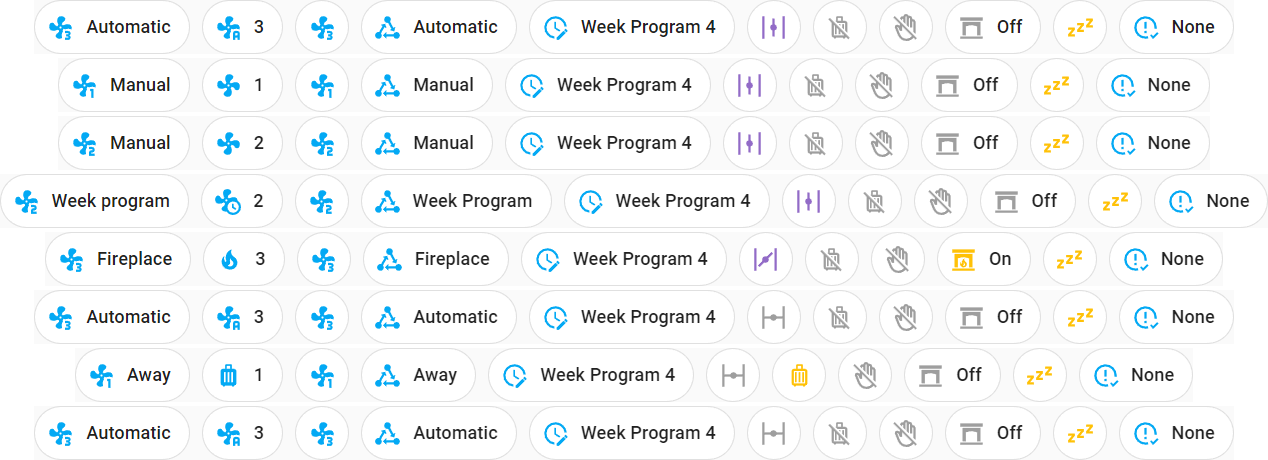
Here are some examples of badges added to the dashboard. The pop-up that appears when clicking on a badge will vary depending on the selected entities, either displaying information or enabling manipulation of the Pluggit unit.


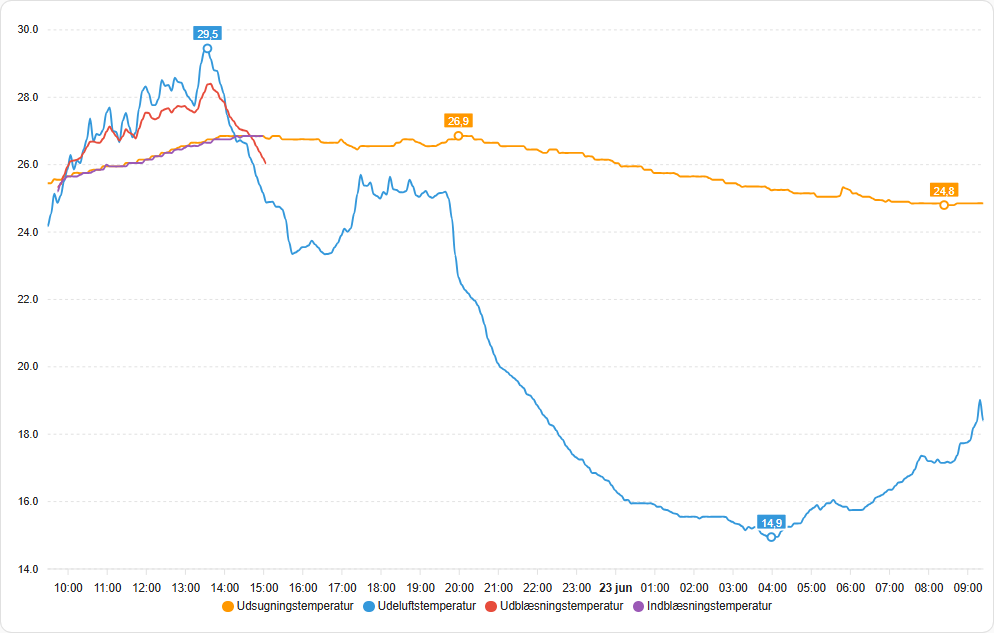
The details for the above Apex-chart card (Can be found on HACS) 👈 Click to open
type: custom:apexcharts-card
update_interval: 5min
apex_config:
  stroke:
    width: 2
    curve: smooth
graph_span: 24h
series:
  - entity: sensor.pluggit_extract_temperature
    name: Extract Temperature
    extend_to: false
    show:
      extremas: true
      legend_value: false
    group_by:
      duration: 5min
      func: avg
  - entity: sensor.pluggit_outdoor_temperature
    name: Outdoor Temperature
    extend_to: false
    show:
      extremas: true
      legend_value: false
    group_by:
      duration: 5min
      func: avg
  - entity: sensor.pluggit_exhaust_temperature
    name: Exhaust Temperature
    extend_to: false
    show:
      legend_value: false
    group_by:
      duration: 5min
      func: avg
  - entity: sensor.pluggit_supply_temperature
    name: Supply Temperature
    extend_to: false
    show:
      legend_value: false
    group_by:
      duration: 5min
      func: avg
To improve the stability and reliability of sensor readings, the integration now supports sensor filtering for key environmental data collected from the Pluggit unit. This filtering mechanism is applied to the following sensors:
- Humidity
- Air Quality
- Exhaust Temperature
- Extract Temperature
- Supply Temperature
- Outdoor Temperature
- Room Temperature
The filtering feature can be enabled or disabled via the “Sensor Filtering” switch entity. By default, the filtering is disabled, ensuring the system behaves as it did previously. When the switch is enabled, the filtering logic described below will be applied.
Each sensor is equipped with a sliding history buffer, storing the last 5 readings. The filter applies two techniques:
-
Initialization Smoothing
For the first few readings (up to 5), the filter calculates a simple average. This helps the sensor start off with a stable baseline, preventing a single bad initial reading from influencing the system. -
Spike Filtering
After initialization, every new reading is compared to a rolling average of the last 5 readings.
If the new reading changes more than a defined threshold (max_change) compared to the rolling average, the spike is rejected, and the system uses the current rolling average instead.
Each sensor type has a predefined maximum allowed change per reading:
| Sensor | Max Change |
|---|---|
| Humidity | 5% RH |
| Air Quality | 50 PPM |
| Temperatures | 2°C |
This ensures the filtering logic fits the natural dynamics of each sensor type.
This feature was inspired by issue #68, reported by a community user.
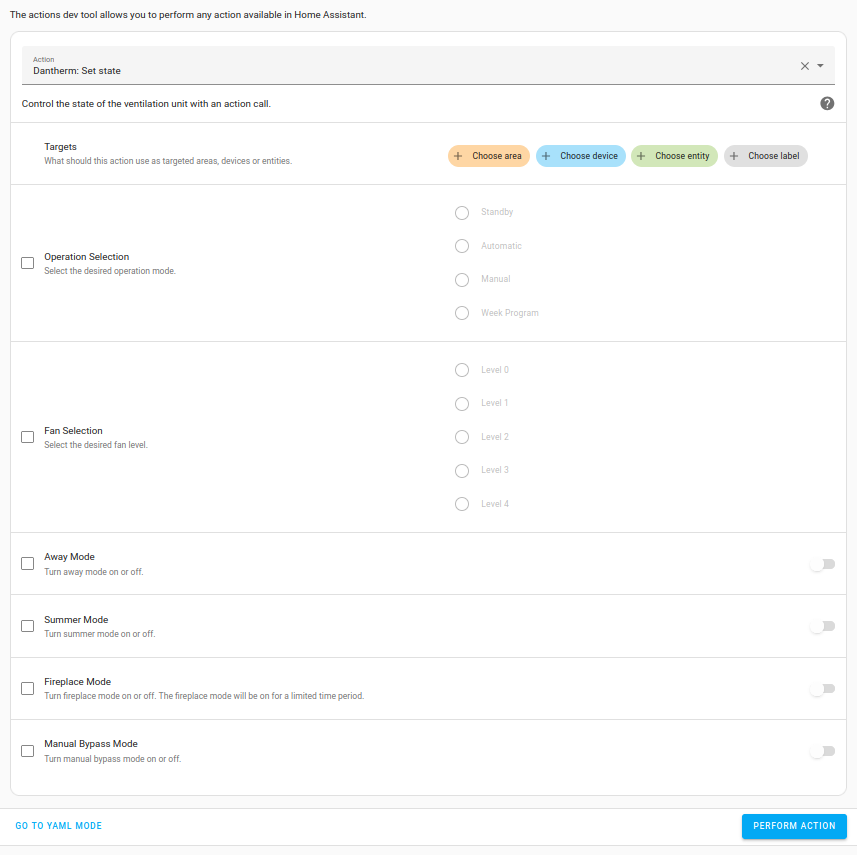
The Pluggit: Set state action allows you to control the state of your Pluggit ventilation unit directly from a Home Assistant automation. This action provides a wide range of options to customize the operation of your unit, making it suitable for various scenarios.
-
Create a New Automation:
- Navigate to
Settings>Automations & Scenes. - Click on Add Automation and select Start with an empty automation.
- Navigate to
-
Configure a Trigger:
- Add a trigger that fits your use case. For example:
- A time-based trigger to schedule changes.
- A sensor-based trigger to react to environmental changes.
- Air Quality Sensor: Trigger when CO2 levels exceed a threshold, e.g., 1000 ppm.
- Humidity Sensor: Trigger when humidity exceeds, e.g., 70%.
- Window Sensor: Trigger when a window opens.
- Cooker Hood: Trigger when the smart plug detects power usage above a threshold.
- Add a trigger that fits your use case. For example:
-
Add the “Pluggit: Set State” Action:
- Under the Actions section, click Add Action.
- Search for
Pluggit: Set statein the action picker and select it.
-
Configure the Action:
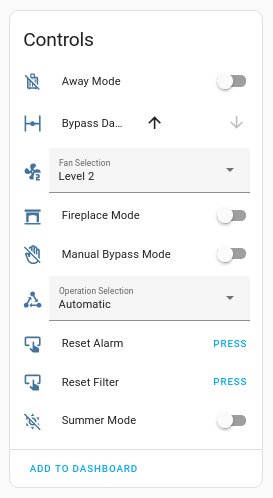
- Use the options provided to control the Pluggit ventilation unit:
- Targets: Choose the area, device, or entity to apply the action.
- Operation Selection: Set the desired operating mode (e.g., Standby, Automatic, Manual, or Week Program).
- Fan Selection: Choose the desired fan level (Level 0–4).
- Modes: Toggle special modes like:
- Away Mode: Enable or disable away mode.
- Summer Mode: Turn summer mode on or off.
- Fireplace Mode: Activate fireplace mode for a limited period.
- Manual Bypass Mode: Enable or disable manual bypass.
- Use the options provided to control the Pluggit ventilation unit:

- Save the Automation:
- Once configured, save the automation. The Pluggit unit will now respond to the specified trigger and perform the desired action.
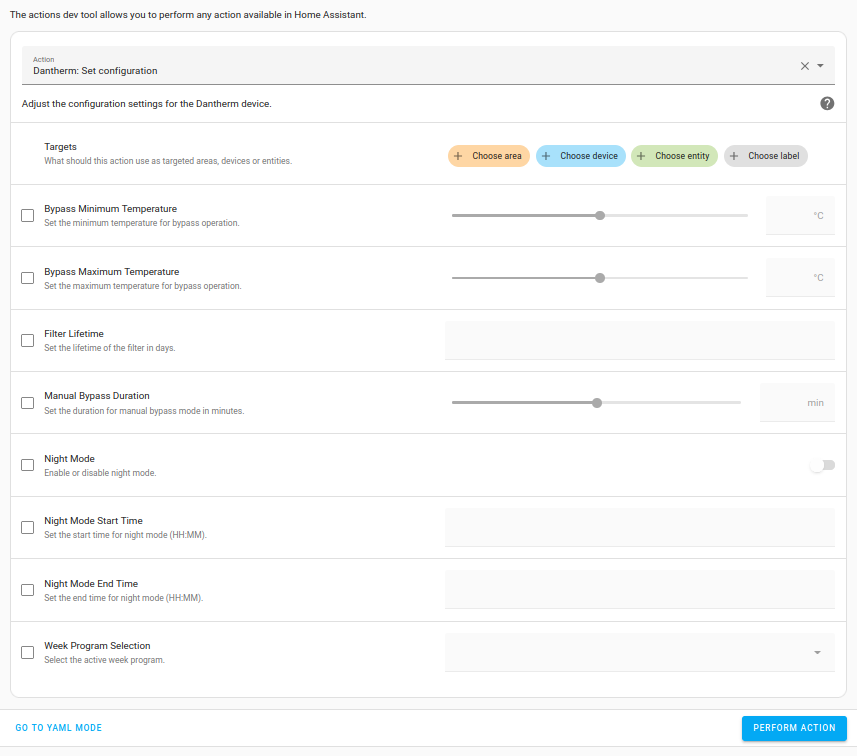
The Pluggit: Set configuration action allows you to adjust various configuration settings of your Pluggit device directly from Home Assistant. This action can be used in automations, scripts, or manually through the Developer Tools.

These features are planned for version 0.5.0. The calendar function is currently still under development.
The integration enhances the control of Pluggit ventilation units by introducing Boost Mode, Eco Mode, Home Mode, and a Calendar Function for advanced scheduling and automation. These features ensure efficient operation based on both schedules and various triggers, providing a comfortable and energy-efficient environment.
Boost Mode is designed for short bursts of increased ventilation, useful after activities like cooking or showering.
- Boost Mode Switch: This must be enabled for Boost Mode to activate.
- Trigger-Based Activation: If Boost Mode is enabled and the Boost Mode Trigger is active, the unit switches to the Boost Operation Selection.
- Timeout Handling: See Trigger Timeout for details on how long Boost Mode remains active after the trigger is deactivated.
- Available Operations:
Level 4,Level 3, orLevel 2.
Important
The Pluggit unit has a built-in automatic setback fromLevel 4toLevel 3after a fixed time period. This may cause Boost Mode to behave unexpectedly ifLevel 4is used for longer periods.
Eco Mode is designed to reduce fan speed under specific environmental conditions, optimizing efficiency and supporting the unit’s defrost mechanism in cold weather.
- Eco Mode Switch: This must be enabled for Eco Mode to activate.
- Trigger-Based Activation: If Eco Mode is enabled and the Eco Mode Trigger is active, the unit switches to the Eco Operation Selection.
- Timeout Handling: See Trigger Timeout for details on how long Eco Mode remains active after the trigger is deactivated.
- Available Operations:
StandbyandLevel 1.
Important
The Pluggit unit has a built-in automatic setback fromStandbytoLevel 3after a fixed time period. This may cause Eco Mode to behave unexpectedly ifStandbyis used for longer periods.
Home Mode allows for automatic adjustments based on a Home Mode Trigger, ensuring efficient ventilation when you are at home.
- Home Mode Switch: This must be enabled for Home Mode to activate.
- Trigger-Based Activation: If Home Mode is enabled and the Home Mode Trigger is active, the unit switches to the Home Operation Selection.
- Timeout Handling: See Trigger Timeout for details on how long Home Mode remains active after the trigger is deactivated.
- Available Operations:
Automatic,Level 3,Level 2,Level 1, orWeek Program.
Each mode trigger (Boost, Eco, Home) includes a configurable timeout that defines how long the mode remains active after the trigger is deactivated.
- Timeout Behavior: After the trigger turns off, the unit continues operating in the triggered mode for the remaining timeout period.
- Reset on Re-trigger: If the trigger is activated again within the timeout window, the countdown restarts.
- Automatic Revert: When the timeout expires without further trigger activity, the unit reverts to the operation mode that was active before the trigger event—unless this has been overridden by a calendar schedule.
This mechanism ensures that temporary conditions (e.g., presence, humidity, low temperature) cause a short-term mode change without disrupting long-term schedules.
Boost, Eco, and Home Modes rely on Adaptive Triggers — binary sensors or helpers that determine when a mode should activate.
An Adaptive Trigger can be:
- A motion sensor (e.g., presence detection for Home Mode)
- A humidity sensor (e.g., high humidity after a shower for Boost Mode)
- A power sensor (e.g., detecting stove or shower fan usage)
- An outdoor temperature sensor (e.g., reducing fan speed in cold weather for Eco Mode)
- A custom helper combining multiple conditions
Adaptive Triggers are configured manually in the integration options and linked to each mode individually.
⚠️ Note
Only entities of typebinary_sensororinput_booleanare supported as Adaptive Triggers.
Make sure the entity returns anonoroffstate.
Entities related to Boost, Eco, and Home Modes (e.g., mode switch, timeout, operation selection) are disabled by default unless a corresponding trigger is configured.
If you manually enable these entities via Home Assistant, they will be automatically disabled again after a reload of the integration unless a valid trigger is set in the integration options.
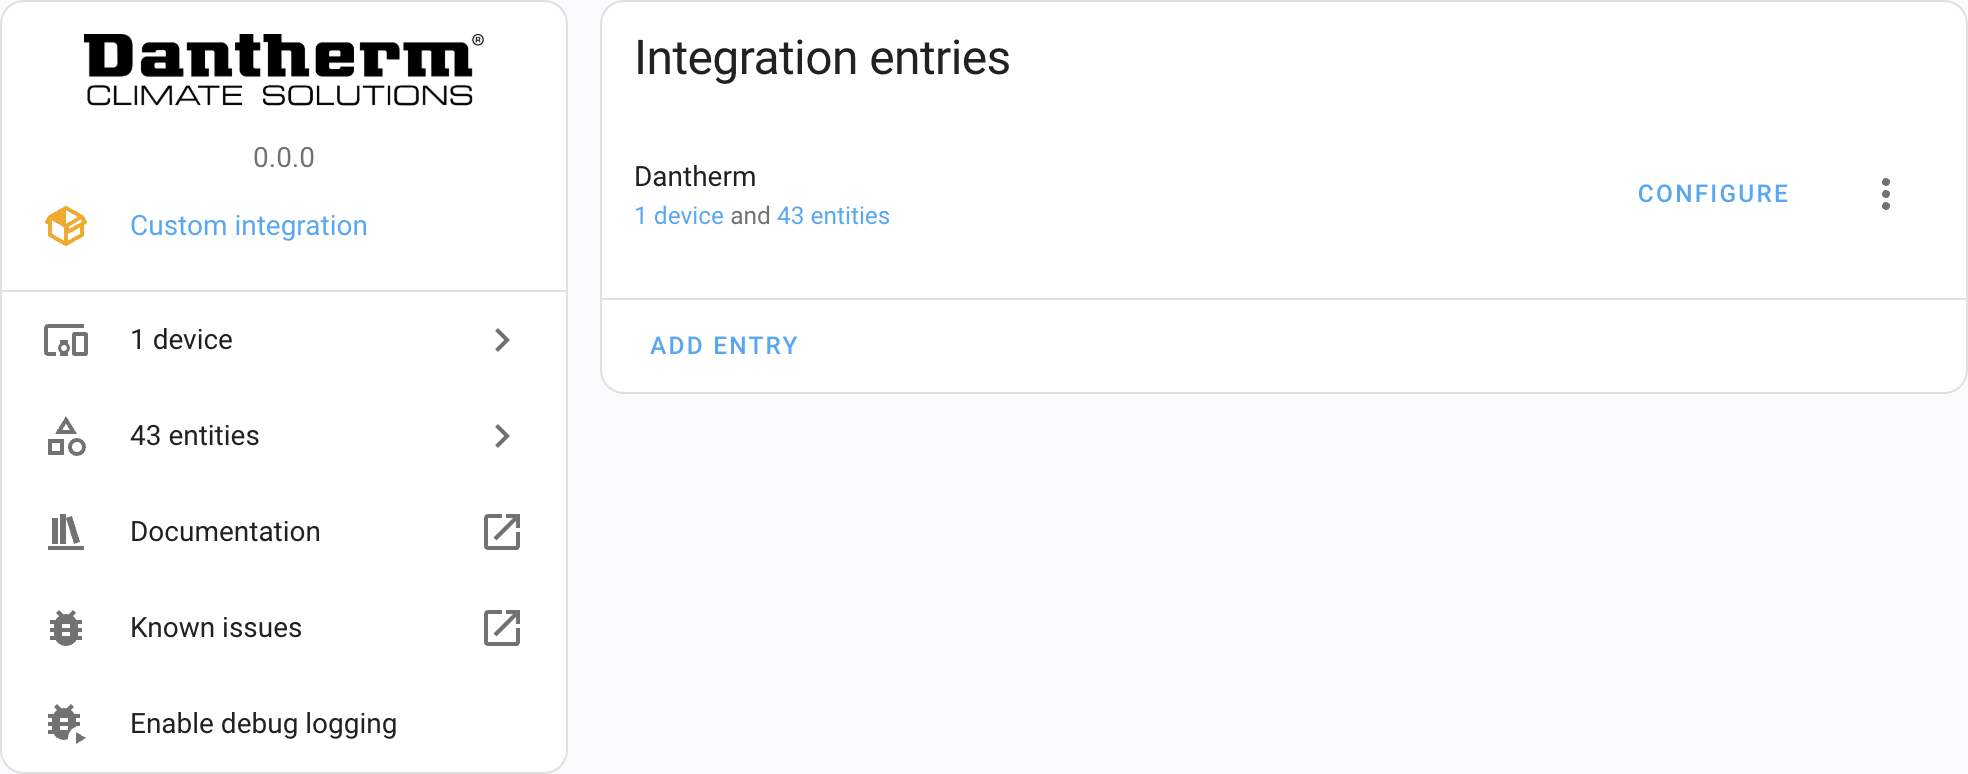
To change settings such as disabling temperature unknown values, disabling notifications, or configuring adaptive triggers:
- Go to Home Assistant → Settings → Devices & Services → Integrations.
- Find the Pluggit integration in the list.

- Click the Configure button (gear icon) for your Pluggit integration instance.
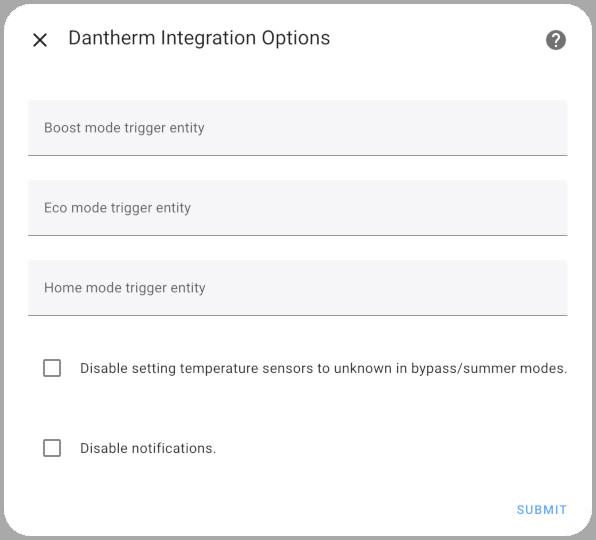
- The options dialog will open, where you can adjust the available settings.

- Enter the trigger entity in the appropriate field.
Use the field for the mode you want to configure (e.g., Boost Mode Trigger, Eco Mode Trigger, or Home Mode Trigger).
Example values:
binary_sensor.kitchen_motion,binary_sensor.living_room_presence,binary_sensor.outdoor_temperature_low - Click Submit to save your configuration.
- Enable the corresponding mode in the Home Assistant UI to activate the trigger.
Once configured, the Pluggit unit will automatically switch to the selected operation mode whenever the Adaptive Trigger becomes active. ⚡
To prevent temperature sensors from being set to unknown during bypass or summer mode, enable the option “Disable setting temperatures to unknown in bypass/summer modes”. When this option is enabled, temperature sensors will always report their current value, even when the device is in bypass or summer mode.
To disable all persistent notifications from the Pluggit integration, enable “Disable notifications”. When this option is enabled, the integration will not send any persistent notifications to Home Assistant’s notification area.
The Calendar Function allows precise scheduling of different operation modes, providing full automation of the ventilation system.
-
Integration – Calendar Events:
By entering an event word into the summary of a calendar event, the selected operation will take effect when the event starts, assuming it has a higher priority event words than an ongoing event. When the event ends, the system will revert to the previously active event. If no underlying event exists, the unit will revert to the Default Operation Selection. -
Event Words: You can schedule “Level 1“, “Level 2“, “Level 3“, “Automatic“, “Away Mode“, “Night Mode“, “Boost Mode“, “Home Mode“, “Eco Mode“, and “Week Program“. These terms will be translated according to the selected language in Home Assistant, assuming your language is supported by the integration.
- If Level 1 to Level 3 is scheduled, the unit will run in Manual mode at the selected fan level.
- If Automatic is scheduled, the unit will operate in Demand Mode.
- If Away Mode is scheduled, Away Mode will be enabled at the start and disabled at the end of the event.
- If Night Mode is scheduled, Night Mode will be enabled at the start and disabled at the end of the event.
- If Boost Mode, Home Mode, or Eco Mode is scheduled, the respective mode’s trigger will be enabled at the start and disabled at the end, allowing the unit to switch modes dynamically.
- If Week Program is scheduled, the unit will follow the selected program in Week Program Selection.
-
Priority System: The following is the priority order for calendar scheduling:
- Away Mode (highest priority)
- Boost Mode
- Night Mode
- Home Mode
- Eco Mode
- Level 3
- Level 2
- Level 1
- Automatic
- Week Program (lowest priority)
The available operations in Default Operation Selection are Automatic, Level 3, Level 2, Level 1, or Week Program.
Important
The Pluggit unit has built-in Night Mode Start Time and Night Mode End Time. Scheduling Night Mode outside of these times may not function as expected.
These features provide seamless automation and intelligent airflow control, ensuring the ventilation system adapts dynamically to both planned schedules and real-time environmental conditions. 🚀🏡🌱📅
The trademark “Pluggit” is owned by Pluggit GmbH.
The trademark “Dantherm” is owned by Dantherm Group A/S.
All product names, trademarks, and registered trademarks mentioned in this repository are the property of their respective owners.
The author does not guarantee the functionality of this integration and is not responsible for any damage.
Tvalley71
 https://github.com/Tvalley71/pluggit
Leave a Reply