useLireinCore\Yii2ImgCache\ImgCache;
$imgCache = Yii::$container->get(ImgCache::class);
// get thumb url for image '{srcdir}/blog/image.jpg' (preset 'origin')$url = $imgcache->url('blog/image.jpg', 'origin');
// get thumb url for image '{srcdir}/blog/image.jpg' (preset 'origin')$url = \Yii::$app->imgcache->url('blog/image.jpg', 'origin');
See lireincore/imgcacheREADME.md for more information about the available functions.
License
This project is licensed under the MIT License – see the License File file for details
This plugin offers a collection of singletons that encompass global resources and functionalities that can enhance your game’s utility and accessibility.
📢 We don’t currently give support to Godot 3+ as we focus on future stable versions from version 4 onwards
Godot 4+
✨Installation
Automatic (Recommended)
You can download this plugin from the official Godot asset library using the AssetLib tab in your godot editor. Once installed, you’re ready to get started
Manual
To manually install the plugin, create an “addons” folder at the root of your Godot project and then download the contents from the “addons” folder of this repository
GDScript version
This plugin has also been written in GDscript and you can find it on SingletonBundle
Getting Started
Each singleton is separated by a class name that defines its utility. This classes are autoloaded by Godot and added to the root scene make them globally available in all scenes of your project.
🧙♂️ Vector Wizard
A set of useful vector utilities that you are likely to use in your day-to-day work as a game developer. The functions that are marked as v2 means that applies to Vector2 and v3 that applies to Vector3. If v3 functions have no description, it means that they do exactly the same thing but applied in a 3-dimensional space.
Vector2 NormalizeVector(Vector2 value)
Normalize the vector only if it’s not normalized and also changes if it’s diagonal vector and do the proper normalization. Returns the vector
GodotParadiseVectorWizard.NormalizeVector(Vector2(30, -40)) # returns Vector2(1, -1)
A diagonal vector requires additional treatment, which can be applied using this function.
GodotParadiseVectorWizard.NormalizeDiagonalVector(Vector2(-0.7444, 0.7444))
bool IsDiagonalDirection(Vector2 direction)
Performs a basic check and returns whether the direction passed as a parameter is diagonal. This function is used internally by the normalize_diagonal_vector function.
GodotParadiseVectorWizard.is_diagonal_direction(Vector2(1, -1))
Vector2 GenerateRandomDirection()
Simple random Vector2 direction generator, use this function if you need a random direction in some behaviour of your game. The result is normalized
This function generate a n random directions in a Array[Vector2] format from an starting vector point defining the min and max angles:
# 5 Random directionsfrom Vector down (0,1)between90º and 180º
GodotParadiseVectorWizard.GenerateRandomDirectionsOnAngleRange(Vector2.Down,90.0f,180.0f,5)
# 25 random directionsfrom the actual player global position between0 and 360º
GodotParadiseVectorWizard.GenerateRandomDirectionsOnAngleRange(player.GlobalPosition,0.0f,360.0f,25)
Vector2 TranslateXAxisToVector(float axis)
Translate a value that usually comes from Input.GetAxis into a direction Vector2.
Vector2 horizontalDirection = GodotParadiseVectorWizard.TranslateXAxisToVector(Input.GetAxis("ui_left", "ui_right"))
float DistanceManhattanV2(Vector2 a, Vector2 b)
Also known as the “city distance” or “L1 distance”. It measures the distance between two points as the sum of the absolute differences of their coordinates in each dimension.
Examples on where can be useful:
Path of a character in a maze: In a maze game, you can use the Manhattan distance to calculate the distance between a character’s current position and a potential exit. This will help you determine the direction in which the character should move to reach the exit with the least amount of moves, as it only allows moves in straight lines, such as up, down, left and right.
Sliding puzzle: In puzzle games where you must move pieces to solve a puzzle, the Manhattan distance is used to calculate how far a piece is from its target position. The closer a piece is to its correct position, the more it will “fit” into the puzzle.
float DistanceChebysevV2(Vector2 a, Vector2 b)
Also known as the “chess distance” or “L∞ distance”.
It measures the distance between two points as the greater of the absolute differences of their coordinates in each dimension.
Examples on where can be useful:
Movement of a king in chess: In a game of chess, the king moves in any direction (horizontally, vertically or diagonally). The Chebyshev distance is used to determine how many moves it takes for the king to move from its current position to a target square, since the king can move in any of these directions.
Movement in a turn-based strategy game: In a turn-based strategy game, such as Civilization, where units can move in several directions, the Chebyshev distance can be used to calculate the distance between two locations on the map and determine how many turns it would take to get from one to the other.
float LengthManhattanV2(Vector2 a)
The LengthManhattanV2 function calculates the length or magnitude of a two-dimensional vector a using the Manhattan distance. Manhattan distance is determined by summing the absolute differences of the x and y coordinates of the vector. The result is a scalar value that represents the total distance traveled in terms of vertical and horizontal movements, which is useful in situations where movements occur in straight lines along orthogonal axes.
float LengthChebysevV2(Vector2 a, Vector2 b)
The LengthChebysevV2 function calculates the length or magnitude of a two-dimensional vector a using the Chebyshev distance. Chebyshev distance is determined by taking the maximum of the absolute differences between the x and y coordinates of the vector. The result is a scalar value that represents the maximum distance traveled in terms of movements in any direction, whether vertical, horizontal, or diagonal. This metric is useful in situations where movements can occur in multiple directions.
Vector2 ClosestPointOnLineClampedV2(Vector2 a, Vector2 b, Vector2 c)
This function is specifically designed to find the closest point on a line segment, ensuring that the result lies within the boundaries of the segment. It’s particularly useful in scenarios where it’s essential to constrain the closest point to the line.
For example, in a drawing application, you can employ this function to accurately snap a point to the nearest position on a line when creating freehand drawings.
Vector2 ClosestPointOnLineV2(Vector2 a, Vector2 b, Vector2 c)
In contrast to the ClosestPointOnLineClampedV2 function, this variant is intended to identify the closest point on a line segment without imposing any restrictions on its location within or outside the segment. This makes it versatile in situations where you need to find the nearest point on a line but don’t require it to be confined to the segment.
For instance, in a CAD application, you might use this function to locate the closest point on a sketch line to a user-defined point.
float DistanceManhattanV3(Vector3 a, Vector3 b)
float DistanceChebysevV3(Vector3 a, Vector3 b)
float LengthManhattanV3(Vector3 a)
float LengthChebysevV3(Vector3 a, Vector3 b)
Vector3 ClosestPointOnLineClampedV3(Vector3 a, Vector3 b, Vector3 c)
Vector3 ClosestPointOnLineV3(Vector3 a, Vector3 b, Vector3 c)
float ClosestPointOnLineNormalizedV3(Vector3 a, Vector3 b, Vector3 c)
🕶️ General utilities
Utilities that do not have a particular location and belong to a more global scope.
You can use this function to generate a random string with a specified length and character list. For instance, you can utilize this function to create invitation codes for your multiplayer rooms:
To achieve a slow-motion effect you can use this function that receives the time scale (as time goes by frame by frame) and the duration of the freeze in seconds.
FrameFreezed signal is emitted when the effect starts in case you want to listen to it to perform other actions such as triggering animations.
Here you can see a basic example:
To keep environment variables secure, avoid hard-coding sensitive information into your source code. By utilizing environment variables, you can ensure that such information remains protected.
Environment variables provide a standardized and crucial method for effectively managing sensitive information within your software projects. These variables serve as a secure repository for storing a wide range of confidential data, including but not limited to API keys, access tokens, database credentials, and configuration settings.
You can access all features by using the GodotParadiseEnvironment class in any part of your code. This class provides extra functionality while maintaining compatibility with OS.GetEnvironment() and OS.SetEnvironment() for runtime variable management.
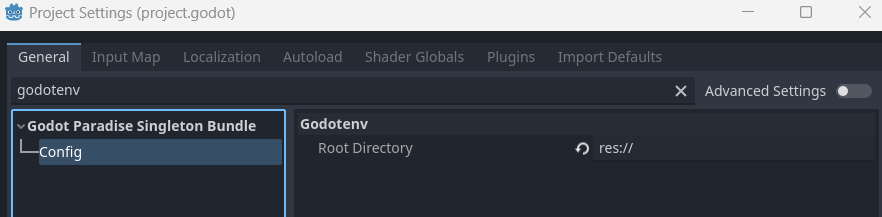
By default, this class looks for .env files in the root of your project res:// To modify this path, you can use:
or set the value on the Project settings -> GodotEnv -> Root directory:
Variable tracker
For internal execution convenience, the plugin tracks active variables without storing their values in array, as storing sensitive content in this array can risk data leaks or unauthorized access. This approach allows you to verify which variables have been read and loaded into memory without exposing their values:
GodotParadiseEnvironment.EnvironmentVariableTracker # could return ["ADDRESS", "PORT", "SERVER_ID]
Example of use
// .env fileADDRESS=127.0.0.1PORT=9492SERVER_ID=1919// random_script.csGodotParadiseEnvironment.LoadEnvFile(".env")
GodotParadiseEnvironment.GetVar("PORT")// Returns an empty string if does not exists// or
GodotParadiseEnvironment.GetVarOrNull("PORT")// Returns null instead
You only need to load your environment variables once, and there’s no need to load them in every _Ready() function in your nodes. If you have duplicate variables, the value used will be the one from the last occurrence. Therefore, it’s important to review your files carefully to avoid unintentional overwriting.
ADDRESS=127.0.0.1ADDRESS=192.168.1.55# This is the one that will be assigned as it overwrites the previous one
Loading variables from other files
This class supports reading multiple environment files. For production, it’s highly advisable to refrain from including the .env file in your source code repository. Instead, consider providing on the repository an .env.example file with blank values for the keys used. This strategy enables you to duplicate the file and input the values in your local environment, thereby averting the inadvertent exposure of sensitive information.
Remove environment variables from the current process runtime. You can add the keys that you do not want to be deleted in this process as second parameter:
This handler facilitates seamless transitions between scenes, offering the option to include a loading screen, particularly useful for larger scenes.
The singleton can be accessed through GodotParadiseSceneTransitioner. This manager utilizes the foundational class GodotParadiseSceneTransition to manage scene transitions.
To effectively utilize this system, you are required to create your transition scenes by extending the foundational class GodotParadiseSceneTransition.
These transition scenes should incorporate the essential signals and parameters necessary for seamless integration with the singleton.
The GodotParadiseSceneTransition primarily functions as a container for managing additional parameters and emitting the appropriate signals.
For example, consider a real use case, such as a fade scene where you can specify the animation name to choose between different types of fades (e.g., ‘fade_in’ or ‘fade_out’).
// This is your transition_scenepublicpartialclassYourTransitionScene:GodotParadiseSceneTransition{publicAnimationPlayeranimationPlayer;publicoverride_Ready(){animationPlayer=GetNode<AnimationPlayer>("AnimationPlayer");animationPlayer.Play(data["animation"])
animationPlayer.AnimationFinished+=OnAnimationFinished;}privatevoidOnAnimationFinished(stringname){if(AnimationPlayer.GetAnimationList().Contains(name)){EmitSignal(SignalName.FinishedTransition,data);QueueFree();}}}
This is an example on how to use the transitioner, the TargetScene parameter can be provided as either a PackedScene or the file path to the desired scene:
PackedSceneTargetScene=ResourceLoader.Load<PackedScene>("res://example.tscn") # or raw string"res://example.tscn"
PackedScene yourTransitionScene=ResourceLoader.Load<PackedScene>("res://transitions/fade.tscn")
GodotParadiseSceneTransitioner.TransitionTo(target_scene,yourTransitionScene,new(){{"animation","fade_in"}})
It’s important to note that the FinishedTransition signal must be manually emitted. This design choice provides flexibility in determining precisely when a transition is considered complete.
Transition with loading screen
This class offers a function designed for working with a loading screen as a transition. To utilize this functionality, your custom loading scene must also extend from GodotParadiseSceneTransition to receive progression data.
In this case, the FinishedTransition signal is emitted after the progress value reachs 1 when the scene load is completed.
This feature is particularly beneficial for large scenes where loading times may be longer. When providing the scene, it should be passed as a file path since our class internally leverages the ResourceLoader
PackedSceneTargetScene=ResourceLoader.Load<PackedScene>("res://large_scene_example.tscn") # or raw string"res://example.tscn"
PackedScene loadingScene=ResourceLoader.Load<PackedScene>("res://transitions/loading.tscn")
GodotParadiseSceneTransitioner.TransitionToWithLoading(target_scene,loading)
In the loading scene, you gain access to progress and load status data retrieved from the ResourceLoader, which you can utilize to display relevant information. Below is a basic example to demonstrate this functionality.
To ensure proper functionality, it’s essential to call the parent base._Process() function; failing to do so will result in the information not being updated:
The primary function responsible for initiating the transition to the target scene is the TransitionTo function. Any data passed to this function will be accessible within the transition scene, enabling the incorporation of external parameters as needed.
It is focused on transitioning pre-loaded scenes.
The Scene parameter can be received as PackedScene or String file path.
It’s worth noting that the transition scene is added to the viewport, not the scene tree. This approach ensures that the transition will execute even if nodes in the main tree are freed
It behaves identically to TransitionTo, but with one key distinction: the scene parameter must be provided as a file path string. This requirement is due to the transitioner’s utilization of the ResourceLoader for scene loading
GodotParadiseSceneTransition
Variables
public TransitionData Data;
public Array Progress;
public ResourceLoader.ThreadLoadStatus LoadStatus
enumThreadLoadStatus:
● THREAD_LOAD_INVALID_RESOURCE=0#The resource is invalid, or has not been loaded with load_threaded_request().
● THREAD_LOAD_IN_PROGRESS=1# The resource is still being loaded.
● THREAD_LOAD_FAILED=2# Some error occurred during loading and it failed.
● THREAD_LOAD_LOADED=3# The resource was loaded successfully and can be accessed via load_threaded_get().
TransitionData is a custom class that transport specific parameters for the transition:
Change the volume of selected BusIndex if it exists. Can receive the bus parameter as name or index.
GodotParadiseAudioManager.ChangeVolume(1,0.5f)
# or
GodotParadiseAudioManager.ChangeVolume("Music",0.5f)
float GetActualVolumeDBFromBusName(string name)
Retrieve the current volume value for the selected bus by its name. If the BusName does not exist in your project, it will raise an error and return a value of 0.0.
Retrieve the current volume value for the selected bus by its index.
GodotParadiseAudioManager.GetActualVolumeDBFromBusIndex(1)
# or
GodotParadiseAudioManager.GetActualVolumeDBFromBusIndex(AudioServer.GetBusIndex("Music"))
Functional Example:
Let’s demonstrate how these functions can assist us in audio management within our game:
If you’re grateful for what we’re doing, please consider a donation. Developing GodotParadise requires massive amount of time and knowledge, especially when it comes to Godot. Even $1 is highly appreciated and shows that you care. Thank you!
🤝Contribution guidelines
Thank you for your interest in Godot Paradise!
To ensure a smooth and collaborative contribution process, please review our contribution guidelines before getting started. These guidelines outline the standards and expectations we uphold in this project.
📓Code of Conduct: We strictly adhere to the Godot code of conduct in this project. As a contributor, it is important to respect and follow this code to maintain a positive and inclusive community.
📇Contact us
If you have built a project, demo, script or example with this plugin let us know and we can publish it here in the repository to help us to improve and to know that what we do is useful.
Dynomite (https://github.com/Netflix/dynomite) is a distributed dynamo layer for redis and memcached hight availability. It is use to replicate each service with data and that’s mainly what we need with OpenShift statefulsets.
Note: memcached is not tested at this time.
The project includes 2 docker images:
dagota: https://hub.docker.com/r/smilelab/dagota/ that is florida like server based on peer-finder (from kubernetes project). It search for pods in the statefulsets and setup a http server that can be used as florida provider in dynomite.
Both images are based on openshift/base-centos7 image to be able to start without any user rights problem on OpenShift.
Also, this images should be coupled with a Redis container that listens on 22122 port (invert of memcached port 11211).
So that Pod has got 3 containers, one for dagota (to send detected peers to dynoite), dynomite that is used as redis proxy, and redis that is the service to use internally. You should make a service to bind on dynomite port (6379) and not on 22122, keep in mind that dynomite is the entrypoint.
Important You must use “dynomite:6379” (Service) from other pods to connect redis ! Don’t connect to redis (22122).
Now you can try to SET/GET values:
$ oc run -it --name=redis-cli --image=redis --restart=Never -- bash
> redis-cli -h dynomite set foo "bar"
OK
> redis-cli -h dynomite get foo
"bar"
> exit

# then remove that pod
oc delete pod redis-cli --now
Notes to not break your init
Be sure that serviceName and SERVICE env var in statefulset are the same value as the Service name
Be sure that clusterIP in service is set to None
Check that redis is listening on 22122
TODO
Better dagota go code
Test memcached
Check why centos/redis-32-centos7 fails some connection while library/redis is ok
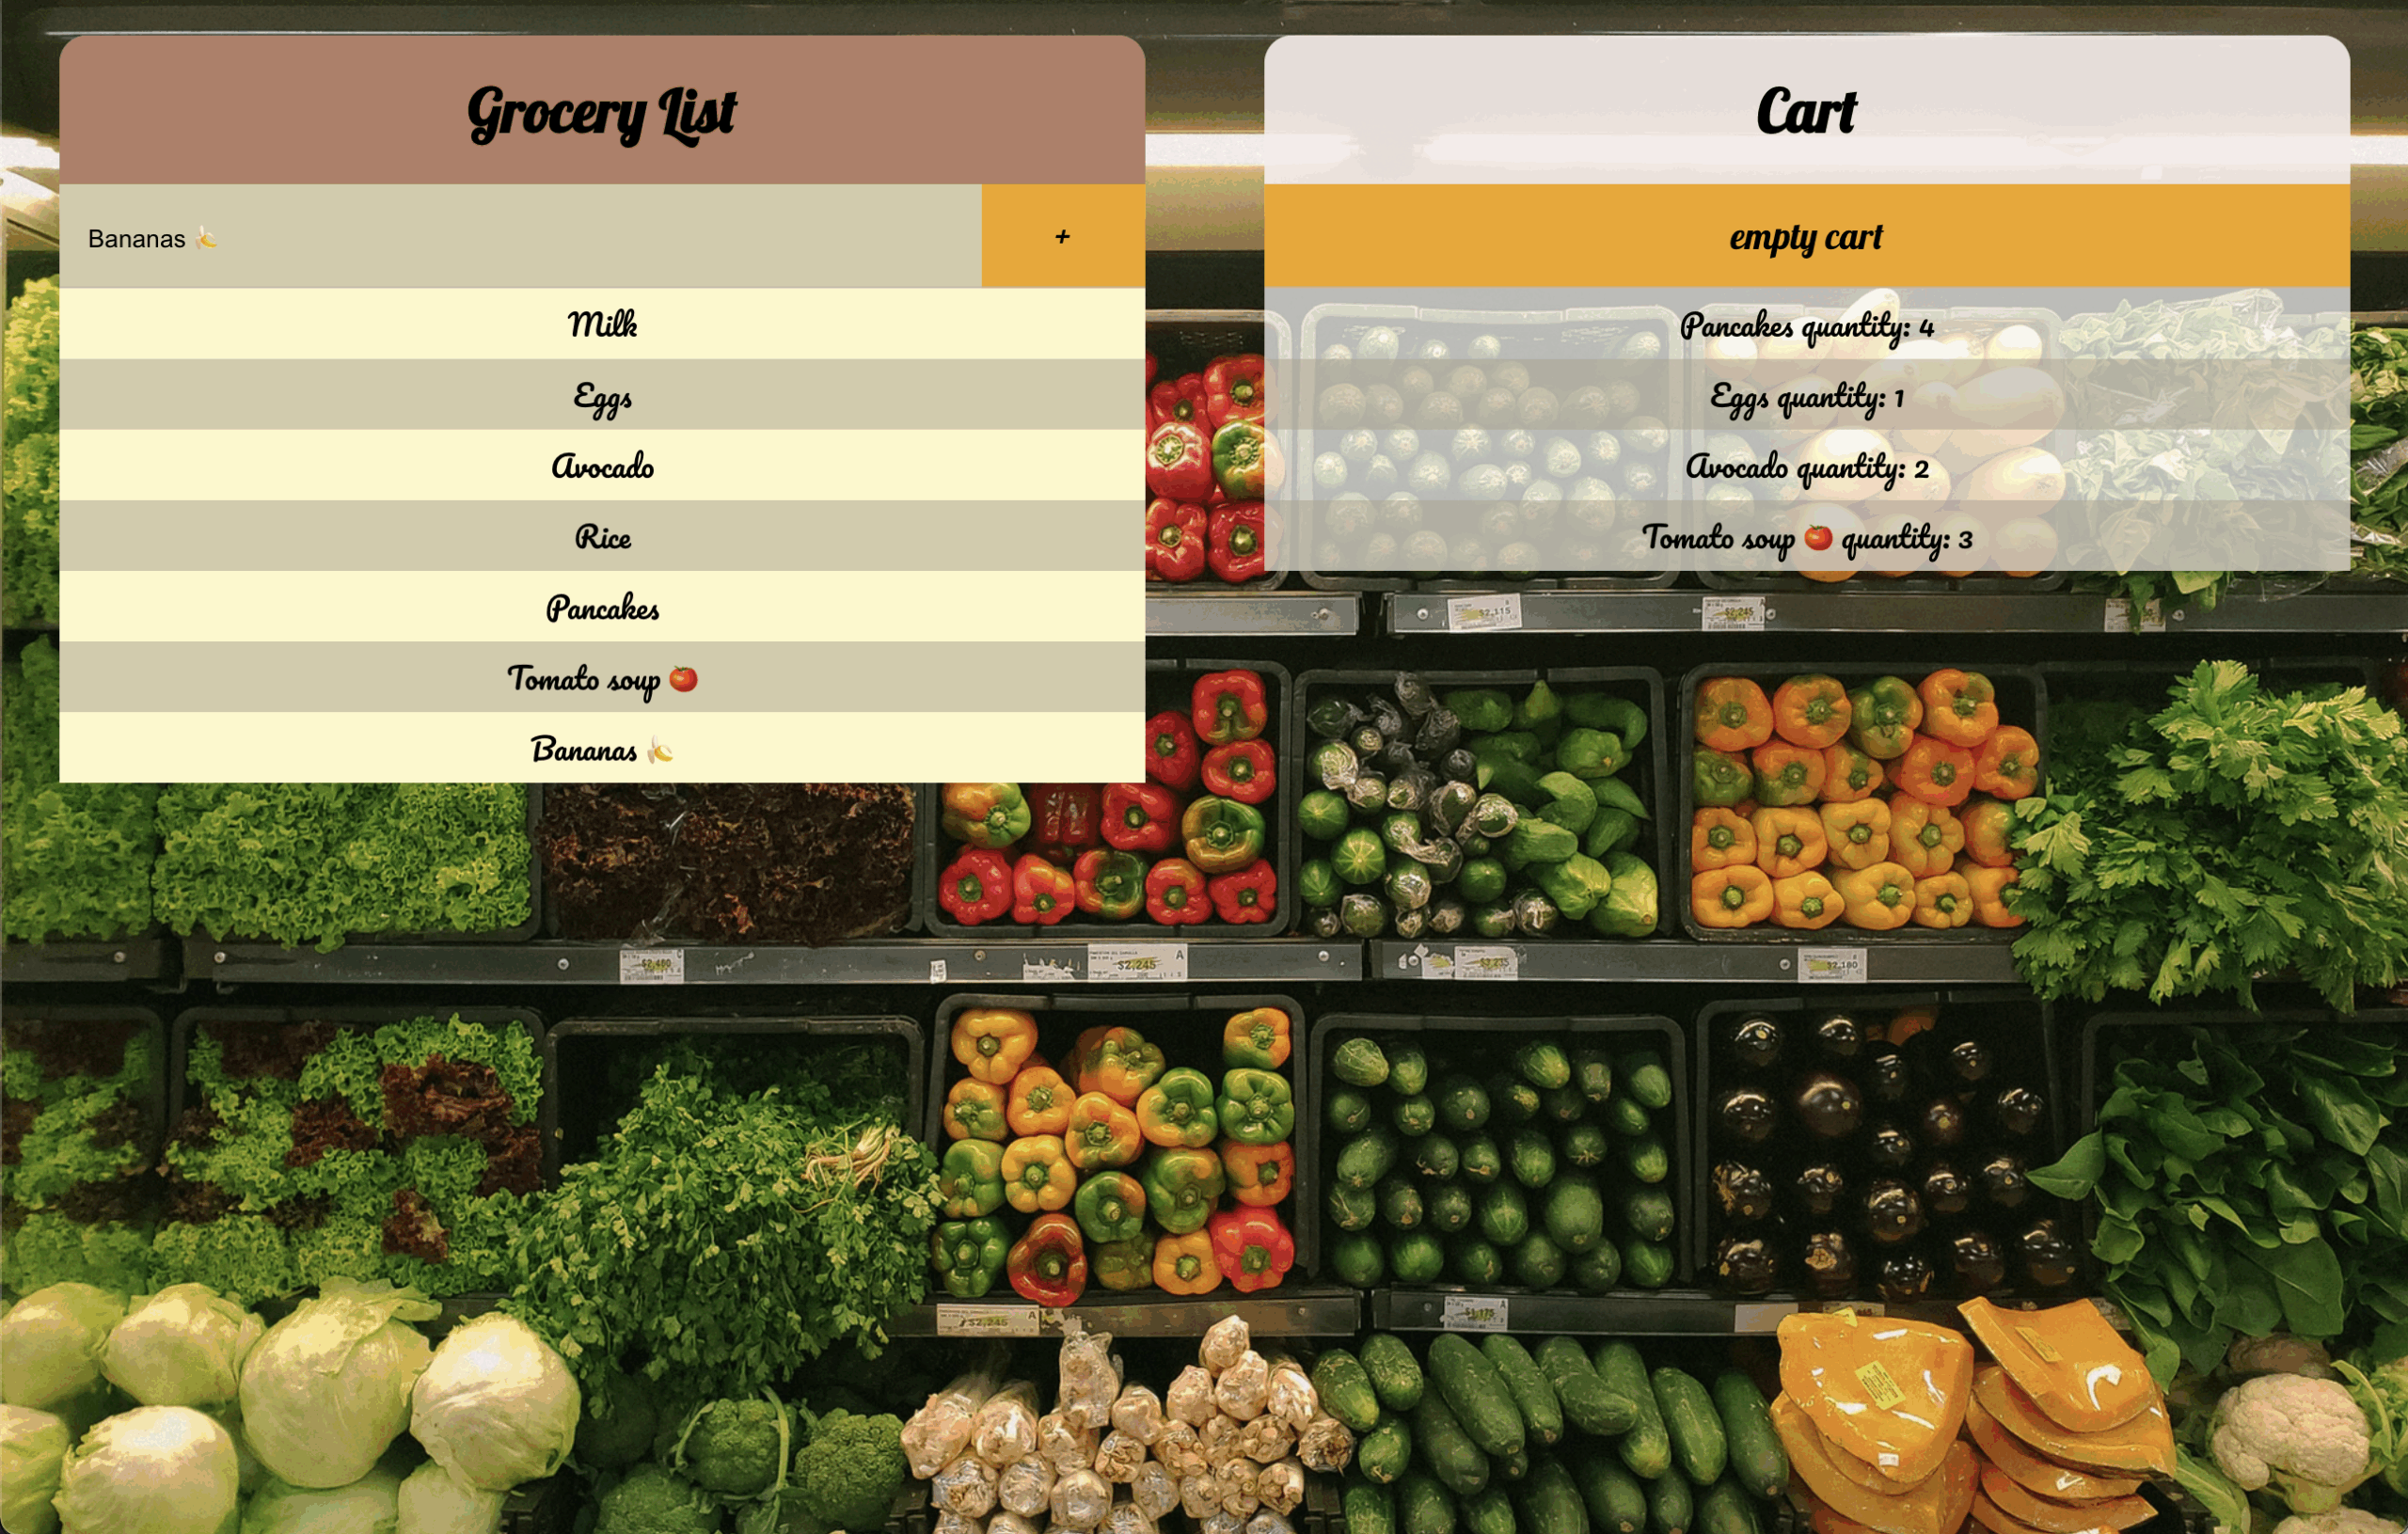
The goal of this webapp is to facilitate doing the groceries by keeping track of your grocery list as well as tracking the items in your shopping cart.
To add a new grocery item, fill the item’s name in the ‘grocery list’ top bar and press ‘+’
To add an item to your ‘shopping cart’, tap on the desired grocery list item
To add multiple items to your cart, tap the desired number of times on the desired grocery list item
To empty your cart, tap on the ’empty cart’ button in the cart’s top bar
Issues/ Missing Features
As a user i’d like to be able to edit and remove items from grocery list and shopping cart
As a user i’d like the possibility to manually enter item quantities
As a user i’d like an item added to cart to automatically or manually be grayed out from my grocery list
Este é um template para desenvolvimento web utilizando React, Vite, TypeScript, SWC (Speedy Web Compiler), ESLint, ESLint Stylistic, Zustand, AWS Sandbox (SDK, Lambda, API Gateway) e ++.
Pré-requisitos
Certifique-se de ter os seguintes itens instalados:
Aqui estão os principais scripts definidos no package.json para gerenciar e construir o projeto:
npm run dev
Inicializa o servidor de desenvolvimento usando o Vite.
Uso: Durante o desenvolvimento, para visualizar as alterações em tempo real.
npm run build
Compila o projeto em TypeScript e gera os arquivos otimizados para produção.
Uso: Quando o projeto está pronto para ser implantado em um ambiente de produção.
npm run preview
Executa uma prévia da versão de produção do projeto gerada pelo build.
Uso: Para verificar como o projeto será exibido em produção.
npm run lint
Analisa o código em busca de problemas de formatação e boas práticas, usando o ESLint.
Uso: Antes de commits ou PRs, para garantir que o código está de acordo com os padrões definidos.
npm run fix
Corrige automaticamente problemas detectados pelo ESLint sempre que possível.
Uso: Após rodar o npm run lint, para ajustar erros de formatação ou pequenos problemas. Ou para uso direto caso deseje realizar as correções de maneira direta.
Estruturação do Projeto
1. Estrutura de Pastas
A estrutura do projeto é organizada para facilitar o desenvolvimento, manutenção e escalabilidade. Abaixo está uma proposta básica:
src/
├── assets/  	                  # Arquivos estáticos como imagens, fontes, etc.
├── components/                  # Componentes reutilizáveis da interface
│   ├── Button/
│   │   ├── Button.tsx
│   │   ├── Button.test.tsx
│   │   └── Button.module.css
├── hooks/                       # Custom Hooks
├── pages/                       # Páginas do projeto (rotas principais)
│   ├── Home/
│   │   ├── index.tsx
│   │   ├── Home.test.tsx
│   │   └── Home.module.css
│   ├── About/
│       ├── index.tsx
│       ├── About.test.tsx
│       └── About.module.css
├── services/    	             # Configurações de APIs e AWS SDK
├── utils/
│   ├── state/ # Configuração do Zustand (gerenciamento de estado)
│                   # Funções utilitárias e helpers
├── App.tsx                      # Arquivo principal do React (root onde serão aplicados Authenticators, contexts e routes)
├── main.tsx                     # Arquivo de inicialização com ReactDOM
└── vite-env.d.ts                # Tipos específicos do Vite

public/
├── index.html                   # Template principal
├── favicon.ico                  # Favicon do site

.vscode/
├── extensions.json              # Extensões recomendadas para o desenvolvimento
├── settings.json                # Configurações padrões para a utilização correta do estlint e testes estáticos
2. Tecnologias Utilizadas
React: Biblioteca popular para criar interfaces de usuário reutilizáveis e baseadas em componentes.
Vite: Build tool moderno e super-rápido para desenvolvimento web.
TypeScript: Adiciona tipagem estática ao JavaScript, garantindo código mais seguro e escalável.
SWC (Speedy Web Compiler): Compilador rápido para transpilar código TypeScript e JavaScript, melhorando o desempenho.
ESLint + Stylistic: Ferramentas para garantir a qualidade do código e consistência no estilo (Testes estáticos).
Vitest: Framework de testes (“Vite Native Test Runner”) responsável por organizar e executar o ambiente de testes.
React Testing Library: Testing library, Jest serve como o ambiente que executa e organiza os testes, enquanto a Testing Library ajuda a interagir com o DOM durante os testes.
Zustand: Biblioteca leve para gerenciamento de estado global, oferecendo simplicidade e flexibilidade.
AWS SDK: Para integração com serviços AWS como Lambda e API Gateway.
AWS Lambda e API Gateway: Estrutura para construir e expor APIs serverless de forma escalável.
Material UI: Biblioteca de componentes react que implementa o “Google’s Material Design”.
git commit -m "Descrição da feature"
git push origin minha-feature
Abra um Pull Request detalhando as mudanças.
4. To-Do List
Configuração inicial do projeto com Vite.
Integração do SWC para compilação.
Linter configurado com ESLint e Stylistic.
Configuração de rotas com react-router-dom.
implementar vitest
Configuração do Zustand para gerenciamento de estado.
Implementação de exemplo básico de AWS Lambda e API Gateway.
Testes unitários e integração com CI/CD.
5. Deploy
O deploy preferencial será realizado na AWS:
Pipeline Sugerido:
Build do projeto com vite build.
Upload dos arquivos estáticos no S3 para servir como frontend.
Configuração de APIs utilizando AWS Lambda e API Gateway.
Gerenciamento de permissões e autenticação via IAM ou Cognito.
Comandos úteis:
# Deploy de funções Lambda
aws lambda update-function-code --function-name sua-funcao --zip-file fileb://funcao.zip

# Configuração do API Gateway
aws apigateway import-rest-api --body 'api-config.json'
adicionado jest com ts-jest para funcionamento do jest em vite, excluindo a possibilidade não implementada de testes nos
recursos:
import.meta:
O Jest não compreende import.meta nativamente porque ele é baseado em CJS por padrão, enquanto import.meta é específico de ESM.
Transformações .vue
O Jest precisa de transformadores específicos para entender e processar os arquivos .vue. Sem isso, ele trata os arquivos como texto bruto, gerando erros.
Conclusão
Esses recursos foram projetados para melhorar a experiência de desenvolvimento e a performance no Vite. Eles facilitam o trabalho com módulos dinâmicos e o desenvolvimento em frameworks como Vue.js. Se você está usando o Jest, precisará configurar transformadores adicionais (como o vite-jest) para que esses recursos sejam corretamente interpretados.
eslint-plugin-jest
Esse trecho da documentação explica como configurar o ESLint para evitar erros ao usar Jest nos arquivos de teste. O problema principal que ele aborda é que o ESLint, por padrão, não conhece os globais do Jest (como describe, it, expect, etc.), o que pode gerar erros como no-undef. A seguir, explicarei cada solução apresentada:
Correção
Para corrigir os dois erros acima, utilizaremos a mudança para o ViTest, que é o “tester runner” nativo do vite que tem uma performance muito melhor que a do jest e é mais bem integrável com o vite
“This is Vitest, a next generation testing framework powered by Vite.”
Pull requests are welcome! Feel free to browse through open issues to look for things that need work. If you have a feature request or bug, please open a new issue so i can track it.
Copyright 2018 Irozon, Inc.

Licensed under the Apache License, Version 2.0 (the "License");
you may not use this file except in compliance with the License.
You may obtain a copy of the License at

   http://www.apache.org/licenses/LICENSE-2.0

Unless required by applicable law or agreed to in writing, software
distributed under the License is distributed on an "AS IS" BASIS,
WITHOUT WARRANTIES OR CONDITIONS OF ANY KIND, either express or implied.
See the License for the specific language governing permissions and
limitations under the License.
Becoming interested in Docker and Microservices I decided to give it a shot and replace my classic Nginx/Nextcloud installation by something containerized.
In my research I came across traefik. It acts not only as a HTTP reverse proxy, and as a load balancer. It can also dynamically detect running microservices and create routes to them. One of my personal favourites is also, that it can automatically install Let’s Encrypt certificates and route all traffic through https.
As a starter I studied the excellent DigitalOcean tutorial on a traefic/WordPress setup:
Replace passwordhash with the output you copied in the previous step, and enter your email address, which will be used for the Let’s encrypt certificate generation.
The ssl certificate information will be stored inside acme.json. Therefore we need to create it:
touch acme.json
chmod 600 acme.json
docker-composer configuration
Docker-composer will take care of starting up the docker containers in the right order with the right configuration.
First a docker network named proxy is created which will serve internally for the docker containers:
docker network create proxy
Then docker-composer is configured using a docker-compose.yml file:
Replace all three mydomain.com occurences with your domain, and adjust the /path/to/ in the traefik volumes.
As you can see, traefik itself is coming as a docker container 🙂
Unlike in the DigitalOcean tutorial, I included the traefik container inside the docker-composer configuration file. Like that the whole setup can comfortably be started with one single command.
Next important step before starting, is to set the MYSQL_ROOT_PASSWORD variable with:
Of course with replacing secure_database_password with your secure password. This password will be used to login to MySQL using adminer.
Starting
Time to run it.
docker-compose up -d
This should install and start all the containers specified in the docker-compose.yml. If there are problems it can be useful to run just docker-compose up which will give output on the console.
Choose MySQL as the database. In the database fields enter your root user credentials, and for the server use mysql:3306. If everything goes well, Nextcloud will generate your user and a MySQL user, and you should see soon the Nextcloud welcome screen.
This website is not affiliated with Riot Games, this was made by Abishake inspired from RumbleMike’s ValorStreamOverlay
About
Hi y’all, this website was built after being inspired from RumbleMike’s ValorStreamOverlay. I felt the installation process involved was too complex for a gamer and hence made this website. This website fetches your Rank Points from RIOT Servers(unofficially) and calculates your ELO and recent ELO changes. The site requires your username and password to fetch and display the required data (Would love to hear if you’ve found other alternatives). Check out RumbleMikes app if you’re a streamer: ValorStreamOverlay.
Notes
Neither username nor password are logged/stored in the server. The autofilling of username and password from second usage is stored locally in your browser. You can check the source code here (frontend) and here (backend). However, the backend is hosted in heroku (third-party hosting service). Hence, I highly recommend you to change your password to something that you’re not using in other services like email, social media etc., so that in the event of highly unlikely data leak, the other services do not get affected.
If you still feel uncomfortable using the site, you can setup the site locally (frontend and backend), which is completely safe or use RumbleMike’s ValorStreamOverlay.
How to use the site
Just enter username, password and region and click submit -> Voila!
Credits and tech used
valorant.js – A nice API wrapper for valorant with oauth; Used a customised version of the same to handle requests to RIOT servers.
ValorStreamOverlay – A wonderful stream overlay from RumbleMike; The RP and ELO calculations are based on the algorithm used in this repo.
Hey Riot, as explained above, this site just fetches data from the RIOT API and does not affect the game in any way. If this website is not something you approve of, please message me by creating an issue here.


 https://github.com/tomohiro/puppet-mackerel_agent