Author: u1sbxhkjoqp2

  • fortify

    Teddy
    Fortify

    Fortify is a puzzle game where your objective is to protect teddy 🧸

    This game was made during the Global Game Jam 2019 (GGJ). The theme of the jam was:

    What home means to you

    This project was bootstrapped with phaser-template and hosted on remarkablegames. To learn more, read the following blog post.

    Play this game on:

    Prerequisites

    Install

    Clone repository:

    git clone https://github.com/remarkablegames/fortify.git

    Install dependencies:

    npm install

    Available Scripts

    In the project directory, you can run:

    npm start

    Runs the game in the development mode.

    Open http://localhost:3000 to view it in the browser.

    The page will reload if you make edits.

    You will also see any lint errors in the console.

    npm run build

    Builds the game for production to the build folder.

    It correctly bundles in production mode and optimizes the build for the best performance.

    The build is minified and the filenames include the hashes.

    Your game is ready to be deployed!

    npm run release

    Bumps the package.json using standard-version.

    npm run deploy

    Deploys the game to GitHub Pages by force pushing the build folder to the remote repository’s gh-pages branch.

    Uploading the Game

    If you’re uploading the game to a site, make sure to do the following:

    1. Open package.json and change the "homepage" value to ".". This ensures the links are relative. Optional: update the game config url in src/index.js.

    2. Optional: remove GitHub Corners from public/index.html and src/index.css.

    3. Build the game, remove any unnecessary files, and compress the folder into a zip archive:

      npm run clean
      npm run build
      rm build/service-worker.js
      zip -r fortify.zip build
    4. Don’t forget to clean up the project directory after the upload succeeds:

      rm fortify.zip

    Contributors

    Ben Budnevich   Dan Phillips   remarkablemark

    License

    MIT

    Visit original content creator repository
  • reclutch

    Reclutch

    Build Status

    A strong foundation for building predictable and straight-forward Rust UI toolkits. Reclutch is:

    • Bare: Very little UI code is included. In practice it’s a utility library which makes very little assumptions about the toolkit or UI.
    • Platform-agnostic: Although a default display object is provided, the type of display object is generic, meaning you can build for platforms other than desktop. For example you can create web applications simply by using DOM nodes as display objects while still being efficient, given the retained-mode design.
    • Reusable: Provided structures such as unbound queue handlers allow for the reuse of common logical components across widgets.

    Overview

    Reclutch implements the well-known retained-mode widget ownership design within safe Rust, following along the footsteps of popular desktop frameworks. To implement this behavior, three core ideas are implemented:

    • A widget ownership model with no middleman, allowing widgets to mutate children at any time, but also collect children as a whole to make traversing the widget tree a trivial task.
    • A robust event queue system with support for futures, crossbeam and winit event loop integration, plus a multitude of queue utilities and queue variations for support in any environment.
    • An event queue abstraction to facilitate just-in-time event coordination between widgets, filling any pitfalls that may arise when using event queues. Beyond this, it also moves the code to handle queues to the constructor, presenting an opportunity to modularize and reuse logic across widgets.

    Note for MacOS

    There appears to be a bug with shared OpenGL textures on MacOS. As a result, the opengl example won’t work correctly. For applications that require rendering from multiple contexts into a single texture, consider using Vulkan or similar.

    Also see:

    Example

    All rendering details have been excluded for simplicity.

    #[derive(WidgetChildren)]
    struct Button {
        pub button_press: RcEventQueue<()>,
        graph: VerbGraph<Button, ()>,
    }
    
    impl Button {
        pub fn new(global: &mut RcEventQueue<WindowEvent>) -> Self {
            Button {
                button_press: RcEventQueue::new(),
                global_listener: VerbGraph::new().add(
                    "global",
                    QueueHandler::new(global).on("click", |button, _aux, _event: WindowEvent| {
                        button.button_press.emit_owned(());
                    }),
                ),
            }
        }
    }
    
    impl Widget for Button {
        type UpdateAux = ();
        type GraphicalAux = ();
        type DisplayObject = DisplayCommand;
    
        fn bounds(&self) -> Rect { /* --snip-- */ }
    
        fn update(&mut self, aux: &mut ()) {
            // Note: this helper function requires that `HasVerbGraph` be implemented on `Self`.
            reclutch_verbgraph::update_all(self, aux);
            // The equivalent version which doesn't require `HasVerbGraph` is;
            let mut graph = self.graph.take().unwrap();
            graph.update_all(self, aux);
            self.graph = Some(graph);
        }
    
        fn draw(&mut self, display: &mut dyn GraphicsDisplay, _aux: &mut ()) { /* --snip-- */ }
    }

    The classic counter example can be found in examples/overview.


    Children

    Children are stored manually by the implementing widget type.

    #[derive(WidgetChildren)]
    struct ExampleWidget {
        #[widget_child]
        child: AnotherWidget,
        #[vec_widget_child]
        children: Vec<AnotherWidget>,
    }

    Which expands to exactly…

    impl reclutch::widget::WidgetChildren for ExampleWidget {
        fn children(
            &self,
        ) -> Vec<
            &dyn reclutch::widget::WidgetChildren<
                UpdateAux = Self::UpdateAux,
                GraphicalAux = Self::GraphicalAux,
                DisplayObject = Self::DisplayObject,
            >,
        > {
            let mut children = Vec::with_capacity(1 + self.children.len());
            children.push(&self.child as _);
            for child in &self.children {
                children.push(child as _);
            }
            children
        }
    
        fn children_mut(
            &mut self,
        ) -> Vec<
            &mut dyn reclutch::widget::WidgetChildren<
                UpdateAux = Self::UpdateAux,
                GraphicalAux = Self::GraphicalAux,
                DisplayObject = Self::DisplayObject,
            >,
        > {
            let mut children = Vec::with_capacity(1 + self.children.len());
            children.push(&mut self.child as _);
            for child in &mut self.children {
                children.push(child as _);
            }
            children
        }
    }

    (Note: you can switch out the reclutch::widget::WidgetChildrens above with your own trait using #[widget_children_trait(...)])

    Then all the other functions (draw, update, maybe even bounds for parent clipping) are propagated manually (or your API can have a function which automatically and recursively invokes for both parent and child);

    fn draw(&mut self, display: &mut dyn GraphicsDisplay) {
        // do our own rendering here...
    
        // ...then propagate to children
        for child in self.children_mut() {
            child.draw(display);
        }
    }

    Note: WidgetChildren requires that Widget is implemented.

    The derive functionality is a feature, enabled by default.

    Rendering

    Rendering is done through “command groups”. It’s designed in a way that both a retained-mode renderer (e.g. WebRender) and an immediate-mode renderer (Direct2D, Skia, Cairo) can be implemented. The API also supports Z-Order.

    struct VisualWidget {
        command_group: CommandGroup,
    }
    
    impl Widget for VisualWidget {
        // --snip--
    
        fn update(&mut self, _aux: &mut ()) {
            if self.changed {
                // This simply sets an internal boolean to "true", so don't be afraid to call it multiple times during updating.
                self.command_group.repaint();
            }
        }
    
        // Draws a nice red rectangle.
        fn draw(&mut self, display: &mut dyn GraphicsDisplay, _aux: &mut ()) {
            let mut builder = DisplayListBuilder::new();
            builder.push_rectangle(
                Rect::new(Point::new(10.0, 10.0), Size::new(30.0, 50.0)),
                GraphicsDisplayPaint::Fill(Color::new(1.0, 0.0, 0.0, 1.0).into()),
                None);
    
            // Only pushes/modifies the command group if a repaint is needed.
            self.command_group.push(display, &builder.build(), Default::default(), None, true);
    
            draw_children();
        }
    
        // --snip--
    }

    Updating

    The update method on widgets is an opportunity for widgets to update layout, animations, etc. and more importantly handle events that have been emitted since the last update.

    Widgets have an associated type; UpdateAux which allows for a global object to be passed around during updating. This is useful for things like updating a layout.

    Here’s a simple example;

    type UpdateAux = Globals;
    
    fn update(&mut self, aux: &mut Globals) {
        if aux.layout.node_is_dirty(self.layout_node) {
            self.bounds = aux.layout.get_node(self.layout_node);
            self.command_group.repaint();
        }
    
        self.update_animations(aux.delta_time());
    
        // propagation is done manually
        for child in self.children_mut() {
            child.update(aux);
        }
    
        // If your UI doesn't update constantly, then you must check child events *after* propagation,
        // but if it does update constantly, then it's more of a micro-optimization, since any missed events
        // will come back around next update.
        //
        // This kind of consideration can be avoided by using the more "modern" updating API; `verbgraph`,
        // which is discussed in the "Updating correctly" section.
        for press_event in self.button_press_listener.peek() {
            self.on_button_press(press_event);
        }
    }

    Updating correctly

    The above code is fine, but for more a complex UI then there is the possibility of events being processed out-of-order. To fix this, Reclutch has the verbgraph module; a facility to jump between widgets and into their specific queue handlers. In essence, it breaks the linear execution of update procedures so that dependent events can be handled even if the primary update function has already be executed.

    This is best shown through example;

    fn new() -> Self {
        let graph = verbgraph! {
            Self as obj,
            Aux as aux,
    
            // the string "count_up" is the tag used to identify procedures.
            // they can also overlap.
            "count_up" => event in &count_up.event => {
                click => {
                    // here we mutate a variable that `obj.template_label` implicitly/indirectly depends on.
                    obj.count += 1;
                    // Here template_label is assumed to be a label whose text uses a template engine
                    // that needs to be explicitly rendered.
                    obj.template_label.values[0] = obj.count.to_string();
                    // If we don't call this then `obj.dynamic_label` doesn't
                    // get a chance to respond to our changes in this update pass.
                    // This doesn't invoke the entire update cycle for `template_label`, only the specific part we care about; `"update_template"`.
                    reclutch_verbgraph::require_update(&mut obj.template_label, aux, "update_template");
                    // "update_template" refers to the tag.
                }
            }
        };
        // ...
    }
    
    fn update(&mut self, aux: &mut Aux) {
        for child in self.children_mut() {
            child.update(aux);
        }
    
        reclutch_verbgraph::update_all(self, aux);
    }

    In the verbgraph module is also the Event trait, which is required to support the syntax seen in verbgraph!.

    #[derive(Event, Clone)]
    enum AnEvent {
        #[event_key(pop)]
        Pop,
        #[event_key(squeeze)]
        Squeeze(f32),
        #[event_key(smash)]
        Smash {
            force: f64,
            hulk: bool,
        },
    }

    Generates exactly;

    impl reclutch::verbgraph::Event for AnEvent {
        fn get_key(&self) -> &'static str {
            match self {
                AnEvent::Pop => "pop",
                AnEvent::Squeeze(..) => "squeeze",
                AnEvent::Smash{..} => "smash",
            }
        }
    }
    
    impl AnEvent {
        pub fn unwrap_as_pop(self) -> Option<()> {
            if let AnEvent::Pop = self {
                Some(())
            } else {
                None
            }
        }
    
        pub fn unwrap_as_squeeze(self) -> Option<(f32)> {
            if let AnEvent::Squeeze(x0) = self {
                Some((x0))
            } else {
                None
            }
        }
    
        pub fn unwrap_as_smash(self) -> Option<(f64, bool)> {
            if let AnEvent::Smash{force, hulk} = self {
                Some((force, hulk))
            } else {
                None
            }
        }
    }

    get_key is used to find the correct closure to execute given an event and unwrap_as_ is used to extract the inner information from within the given closure (because once get_key is matched then we can be certain it is of a certain variant).

    License

    Reclutch is licensed under either

    at your choosing.

    This license also applies to all “sub-projects” (event, derive and verbgraph).

    Visit original content creator repository
  • Magento2-Docker-Development

    Magento2 Docker Development Magento2 Docker Development Magento2 Docker Development Magento2 Docker Development Magento2 Docker Development

    Why

    • Running Magento 2 project really fast on your machine.
    • Just a few steps to setup.
    • No extra step to deploy code from host to container.
    • Easy to modify PHP, MySQL, and Nginx configurations.
    • Works on Linux, macOS, and Windows.

    Default Official Images

    • php:7.2-fpm
    • mysql:5.7
    • nginx:1.19

    Prerequisities

    All OS: Install Git

    Linux: Install Docker and Docker-compose.

    MacOS: Install Docker and Docker-compose.

    Windows: Install Docker and Docker-compose.

    Quick Start (new project)

    1. Clone the project:
    git clone https://github.com/jaredchu/Magento2-Docker-Development.git [project_name]
    cd [project_name]
    
    2. Update m2dd/auth.json and fill its data with your credentials.
    3. Run container & Get latest Magento 2 source code
    docker-compose up -d
    docker exec -it app bash -c "rm .gitkeep && composer create-project --repository-url=https://repo.magento.com/ magento/project-community-edition:2.3 . --prefer-dist --no-interaction --dev"
    
    4. Restart containers
    docker-compose down
    docker-compose up -d
    

    You can now start to install your new Magento 2 site via Web Setup Wizard (will be removed in Magento 2.4) or Command Line (recommended).

    Existing Project

    1. Clone the project:
    git clone https://github.com/jaredchu/Magento2-Docker-Development.git [project_name]
    cd [project_name]
    
    2. Copy your magento 2 source code into src folder.
    3. Run the containers:
    docker-compose up -d
    
    4. Import database:
    docker exec -i db mysql -uroot -ppassword magento2 < your-database.sql
    
    5. Modify the DB cofiguration in app/etc/env.php:
    'db' => [
        'table_prefix' => '',
        'connection' => [
            'default' => [
                'host' => 'db',
                'dbname' => 'm2db',
                'username' => 'm2user',
                'password' => 'm2pw',
                'active' => '1',
                'driver_options' => [
                ]
            ]
        ]
    ],
    
    6. Install dependencies:

    Enter the app container TTY (to run any command without docker exec -i app prefix).

    docker exec -it app bash
    

    Run the composer installation:

    composer install
    

    Check magento command is working or not:

    bin/magento --help
    
    7. Add your [local_domain_name] (magento2.local for example) into hosts file.
    127.0.0.1	magento2.local
    ::1             magento2.local
    
    8. Set [local_domain_name] for your local site:
    docker exec -i app bin/magento config:set web/unsecure/base_url http://magento2.local/
    docker exec -i app bin/magento config:set web/unsecure/base_link_url http://magento2.local/
    docker exec -i app bin/magento config:set web/secure/base_url https://magento2.local/
    docker exec -i app bin/magento config:set web/secure/base_link_url https://magento2.local/
    
    9. All done! Visit your [local_domain_name] (http://magento2.local for example) on your browser.

    Usage

    Restart containers (required when you want to apply the changes after modify .env or docker-composer.yml):
    docker-compose down
    docker-compose up -d
    
    Start containers with system-startup:

    Modify .env, replace RESTART_CONDITION=no with RESTART_CONDITION=always.

    Run bin/magento commands:
    docker exec -i app bin/magento [parameters]
    

    or

    docker exec -it app bash
    bin/magento [parameters]
    
    Environment Variables

    All the common variables are in .env.

    Useful File Locations
    • src – your project root directory that contains composer.json and app folder.
    • m2dd/local.ini – PHP configuration file.
    • m2dd/my.cnf – MySQL configuration file.
    • m2dd/auth.json – Composer basic auth file.
    • m2dd/conf.d/ – Contains nginx configuration files.
    • m2dd/ssl/ – Contains SSL certs.
    • m2dd/crontabs/root – Crontab for root user.
    • m2dd/crontabs/www – Crontab for www user.

    Contributing

    Feel free for submitting pull requests to this project.

    Versioning

    This project is using SemVer for versioning. For the versions available, see the tags on this repository.

    Authors

    See also the list of contributors who participated in this project.

    License

    This project is licensed under the MIT License – see the LICENSE.md file for details.

    Visit original content creator repository
  • Laravel-AdminLTE

    Easy AdminLTE integration with Laravel

    Latest Packagist Version Total Downloads GitHub Checks Status Quality Score Code Coverage StyleCI

    This package provides an easy way to quickly set up AdminLTE v3 with Laravel (7 or higher). It has no others requirements and dependencies besides Laravel, so you can start building your admin panel immediately. The package provides a blade template that you can extend and an advanced menu configuration system. Also, and optionally, the package offers a set of AdminLTE styled authentication views that you can use in replacement of the ones that are provided by the legacy laravel/ui authentication scaffolding.

    If you want to use an older Laravel or AdminLTE version, review the following package releases:

    • Releases 1.x: These releases supports Laravel 5 and include AdminLTE v2
    • Releases 2.x: These releases supports Laravel 6 and include AdminLTE v2
    • Releases 3.x (<=3.8.6): These releases supports Laravel 6 and include AdminLTE v3

    Documentation

    All documentation is available at Laravel-AdminLTE Documentation site, we encourage you to read it. If you are new start with the Installation Guide. To update the package consult the Updating Guide.

    Requirements

    The current package requirements are:

    • Laravel >= 8.x
    • PHP >= 7.3

    Issues, Questions and Pull Requests

    You can report issues or ask questions in the issues section. Please, start your issue with [BUG] and your question with [QUESTION] in the subject.

    If you have a question, it is recommended to make a search over the closed issues first.

    To submit a Pull Request, fork this repository and create a new branch to commit your new changes there. Finally, open a Pull Request from your new branch. Refer to the contribution guidelines for detailed instructions. When submitting a Pull Request take the next notes into consideration:

    • Verify that the Pull Request doesn’t introduce a high downgrade on the code quality.
    • If the Pull Request adds a new feature, consider adding a proposal of the documentation for this feature too.
    • Keep the package focused, don’t add special support to other packages or to solve very particular situations. These changes will make the package harder to maintain.
    Visit original content creator repository
  • deps-walker

    deps-walker

    Graph traversal to walk through ESM dependency graph for further static analysis. The traversal algorithm is classified as Breadth-first search (BFS).

    Install

    $ npm install deps-walker

    Usage

    Here is an example of an entry point module entry.js with its dependencies, which in turn depend on their dependencies, which in turn depend on…

    //------ entry.js ------
    import a from './a.js';
    import b from './b.js';
    
    //------ a.js ------
    import b from './b.js';
    import c from './c.js';
    import d from './d.js';
    
    //------ c.js ------
    import d from './d.js';
    
    //------ d.js ------
    import b from './b.js';

    In other words:

    entry.js -> a.js
    entry.js -> b.js
    a.js -> b.js
    a.js -> c.js
    a.js -> d.js
    c.js -> d.js
    d.js -> b.js
    

    dependency graph

    deps-walker is used to traverse entry.js dependency graph:

    const walk = require('deps-walker')();
    
    walk('entry.js', (err, data) => {
      if (err) {
        // catch any errors...
        return;
      }
      const { filePath, dependencies } = data;
      // analyse module dependencies
    });

    The dependencies are traversed in the following order:

    Breadth-first search traverse

    Async/await API

    deps-walker support async/await API, it can be used to await traverse completion:

    async function traverse() {
      await walk('entry.js', (err, data) => {
        /*...*/
      });
      console.log('Traverse is completed');
    }

    Multiple entry points

    deps-walker supports multiple roots:

    walk(['entry1.js', 'entry2.js', 'entry3.js'], (err, data) => {
      /*...*/
    });

    Parsers

    deps-walker uses @babel/parser with sourceType: 'module' option by default. You can specify any other available options:

    const babelParse = require('deps-walker/lib/parsers/babel');
    const walk = require('deps-walker')({
      parse: (...args) =>
          babelParse(...args, {
          // options
          sourceType: 'module',
          plugins: ['jsx', 'flow']
        })
    });

    or specify your own parse implementation:

    const walk = require('deps-walker')({
      parse: (code, filePath) => {
        // parse implementation
      }
    });

    Resolvers

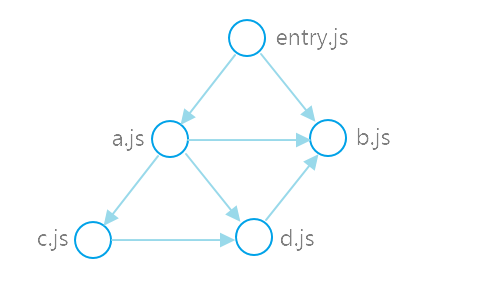
    It is not always obvious where import x from 'module' should look to find the file behind module, it depends on module resolution algorithms, which are specific for module bundlers, module syntax specs, etc.. deps-walker uses resolve package, which implements NodeJS module resolution behavior. You may configure NodeJS resolve via available options:

    const nodejsResolve = require('deps-walker/lib/resolvers/nodejs');
    const walk = require('deps-walker')({
      resolve: (...args) =>
        nodejsResolve(...args, {
          // options
          extensions: ['.js'],
          paths: ['rootDir'],
          moduleDirectory: 'node_modules'
        })
    });

    You can also use other module resolution algorithms:

    const walk = require('deps-walker')({
      resolve: async (filePath, contextPath) => {
        // resolve implementation
      }
    });

    Ignoring

    You may break traversal for some dependencies by specifying ignore function:

    const walk = require('deps-walker')({
      // ignore node_modules
      ignore: filePath => /node_modules/.test(filePath)
    });

    Caching

    Module parsing and resolving can be resource intensive operation (CPU, I/O), cache allows you to speed up consecutive runs:

    const cache = require('deps-walker/cache');
    const walk = require('deps-walker')({ cache });
    //...
    await cache.load('./cache.json');
    await walk('entry.js', (err, data) => {
      /*...*/
    });
    await cache.save('./cache.json');

    Reading

    You can also override the default file reader:

    const fsPromises = require('fs').promises;
    const read = _.memoize(filePath => fsPromises.readFile(filePath, 'utf8'));
    const walk = require('deps-walker')({ read });

    License

    MIT

    Visit original content creator repository
  • dotfiles

    Martin Mena’s Dotfiles and dev environment

    CI Status

    Welcome to my personal dotfiles repository, tailored for the 🐟 Fish shell. These configurations are designed to create a baseline for my development environment, integrating seamlessly with VSCode, Starship, tmux, etc.

    Shell demo

    Key Features

    • Prompt Customization with ⭐️🚀 Starship: A sleek, informative command-line interface built in Rust.

    • Effortless Dotfile Management: Uses chezmoi for a streamlined process to update, install, and configure my environment with a simple one-line command.

    • Intelligent OS Detection: Automatically installs OS-specific packages, ensuring compatibility and ease of setup.

    • User-Guided Installation Script: Tailored setup with interactive prompts to select only the tools I need.

    • Enhanced File Listing with eza: A more colorful and user-friendly ls command.

    • Optimized Tmux Configuration: Benefit from a powerful Tmux setup by gpakosz, enhancing your terminal multiplexer experience.

      Tmux configuration demo

    Getting Started

    Compatibility

    Note: This setup is currently optimized for macOS and Debian-based Linux distributions.

    Installation

    To install, choose one of the following methods and execute the command in my terminal:

    • Curl:

      sh -c "$(curl -fsLS get.chezmoi.io)" -- init --apply mmena1
    • Wget:

      sh -c "$(wget -qO- get.chezmoi.io)" -- init --apply mmena1
    • Homebrew:

      brew install chezmoi
      chezmoi init --apply mmena1
    • Snap:

      snap install chezmoi --classic
      chezmoi init --apply mmena1

    Updating my Setup

    Keep my environment fresh and up-to-date with a simple command:

    chezmoi update

    This will fetch and apply the latest changes from the repository, ensuring my setup remains optimal.

    Under the Hood

    Custom Fish Scripts

    Leveraging the best of oh-my-zsh, I’ve crafted custom Fish scripts, including git and eza abbreviations, enriching my shell without the need for plugins.

    Chezmoi: The Backbone

    At the heart of my dotfile management is Chezmoi, a robust tool offering templating features to dynamically adapt scripts across various systems, alongside the capability to preview and verify scripts before execution.

    Modular Task Management

    A task-based approach is used for managing the setup and configuration of my development environment. Instead of running a monolithic script, the setup process is broken down into discrete tasks that can be individually registered, managed, and executed.

    Key features of the task management system:

    • Task Registration: Each setup component is registered as a task with a name, description, list of dependencies, and execution function.
    • Dependency Resolution: Tasks specify their dependencies, ensuring they’re executed in the correct order. For example, package installation requires Homebrew to be installed first (only for macOS).
    • Interactive Execution: Before each task runs, I’m prompted to confirm, letting me customize my setup process.
    • Error Handling: If a task fails, I can choose to continue with the remaining tasks or abort the setup.
    • Modular Implementation: Setup components are organized into modules (package management, shell configuration, development tools, etc.) that can be maintained independently.

    This approach makes the setup process more maintainable, flexible, and user-friendly. New tasks can be added without modifying existing code, and dependencies are automatically resolved to ensure a smooth setup experience.

    sequenceDiagram
        participant User
        participant SetupScript
        participant TaskManager
        participant TaskModule
    
        User->>SetupScript: Initiate environment setup
        SetupScript->>TaskManager: Register setup tasks
        TaskManager->>TaskManager: Check dependencies for each task
        TaskManager->>TaskModule: Execute task module (e.g., packages, tools, shell)
        TaskModule-->>TaskManager: Return task status
        TaskManager-->>SetupScript: Report consolidated task results
        SetupScript->>User: Display "Setup completed" message
    
    Loading

    Acknowledgments

    A special thanks to:

    License

    This project is licensed under the ISC License – see Martin Mena for more details.

    Visit original content creator repository
  • screen-recorder

    Screen Recorder

    A library to capture and record from your audio and video devices.

    Contains the main library and two example applications (command line and graphic interface).

    A video presentation of the QT application can be found here.

    Build

    MacOS

    1. Install dependencies

    brew install ffmpeg
    brew install fmt
    brew install qt6
    
    1. Build project

    export CMAKE_PREFIX_PATH=/usr/local/Cellar/qt/6.2.2
    mkdir build
    cd build
    cmake -DCMAKE_BUILD_TYPE=Release ..
    cmake --build .  
    

    Linux

    1. Install dependencies

    sudo apt-get install libavdevice-dev
    sudo apt-get install libavfilter-dev
    sudo apt-get install libfmt-dev
    sudo apt-get install libxrandr-dev
    sudo apt-get install pip
    pip install -U pip
    pip install aqtinstall
    aqt install-qt linux desktop 6.2.0
    
    1. Build project

    sudo snap install cmake --classic
    export CMAKE_PREFIX_PATH=~/6.2.0/gcc_64
    mkdir build
    cd build
    cmake -DCMAKE_BUILD_TYPE=Release ..
    cmake --build .  
    

    Windows

    1. Install CMake (>= 3.22)

    2. Install Visual Studio environment for desktop c++ applications

    3. Install Qt6 MSVC environment for desktop applications

    4. Install dependencies

    cd \
    git clone https://github.com/Microsoft/vcpkg.git
    cd vcpkg
    .\bootstrap-vcpkg.bat
    .\vcpkg integrate install
    .\vcpkg install ffmpeg[avcodec,avdevice,avfilter,avformat,avresample,core,gpl,postproc,swresample,swscale,x264,ffmpeg]:x64-windows
    .\vcpkg install fmt:x64-windows
    
    1. Build project

    cmake -DCMAKE_TOOLCHAIN_FILE=C:/vcpkg/scripts/buildsystems/vcpkg.cmake -DCMAKE_BUILD_TYPE:STRING=Release -DCMAKE_PREFIX_PATH=C:/Qt/6.2.3/msvc2019_64 ..
    cmake --build  . -- /property:Configuration=Release
    
    1. Provide dependencies
    • Release:

    cd build\qt_screen_recorder\Release
    C:\Qt\6.2.3\msvc2019_64\bin\windeployqt.exe -qmldir ..\..\..\qt_screen_recorder\components --release appqt_screen_recorder.exe
    
    • Debug:

    cd build\qt_screen_recorder\Debug
    C:\Qt\6.2.3\msvc2019_64\bin\windeployqt.exe -qmldir ..\..\..\qt_screen_recorder\components --debug appqt_screen_recorder.exe
    
    1. Run

    set QSG_RHI_BACKEND=opengl // Might be needed for VMs
    appqt_screen_recorder.exe
    

    Visit original content creator repository

  • iforgor

    Iforgor

    Iforgor is a customisable and easy to use command line tool to manage code samples.
    It’s a good way to quickly get your hand on syntax you dont remember right from your terminal without wasting time looking on the internet.

    Installation

    Method :

    Creates symlinks of iforgor.py and the snippets folder to /usr/local/bin. So that it can be run from anywhere on the terminal.

    Requirements :

    • Python.
    • Git.
    • The colorama python module.

    Step by step procedure :

    1. Open a terminal and cd into the directory you want to install the program into.

    2. Run “git clone https://github.com/Solirs/iforgor/

    3. Cd into the newly created “iforgor” directory

    4. Run “./setup.sh” as root (it has to be run as root since it needs to create files in /usr/local/bin), add the ungit argument to remove github related files and folders like the readme and license.

    5. Run “iforgor -h”

    If it works, the install was successful.
    You can then delete setup.sh

    Uninstall:

    To uninstall, simply delete the ‘iforgor’ and ‘snippets’ symlinks in /usr/local/bin.

    Then delete the iforgor folder.

    Iforgor 101

    To display a piece of code, run the following.

    iforgor LANGUAGE SNIPPET

    The language argument represents a folder in the “snippets” directory.
    You can add any language you want by creating a folder in it.

    The snippet argument represents a *.txt file in the specified language directory that containd the code sample you want to display.
    You can add any code sample by creating a *.txt in a desired language folder.

    So if you want to add a function sample for the, lets say Rust language for example.
    You will have to create a directory named “rust” in the snippets folder.
    And create a function.txt file in the rust folder with the code you want inside.

    You can then print it out by running iforgor rust function

    Pro tips:

    • Languages and snippets are case insensitive. So you can run ‘iforgor lAnGuAgE sNiPpeT’.

    • You dont need to do the setup process, but its required if you want to be able to run iforgor easily from anywhere.

    • There are default snippets yes, but iforgor is designed to be customized, dont hesitate to add your own custom snippets and languages.

    Screenshots:

    alt text

    Compatibility

    Linux

    This should work on pretty much any linux distro, but i can make mistakes, so dont hesitate opening an issue if you face problems.

    Iforgor was tested on:

    Debian 11 : Working

    Void Linux : Working

    Arch Linux : Working

    BSDs and other unix based operating systems.

    Those are less certain to work, but you can still give it a try.

    Tested on:

    FreeBSD : Working

    OpenBSD : Working

    Want to contribute ?

    Sure. All help is accepted.

    The code is very commented if you want to take a look at it.

    PLEASE dont forget to star the project if you find it interesting, it helps out a ton.

    Visit original content creator repository

  • minisound

    minisound

    A high-level real-time audio playback, generation and recording library based on miniaudio. The library offers basic functionality and quite low latency. Supports MP3, WAV and FLAC formats.

    Platform support

    Platform Tested Supposed to work Unsupported
    Android SDK 31, 19 SDK 16+ SDK 15-
    iOS None Unknown Unknown
    Windows 11, 7 (x64) Vista+ XP-
    macOS None Unknown Unknown
    Linux Fedora 39-40, Mint 22 Any None
    Web Chrome 93+, Firefox 79+, Safari 16+ Browsers with an AudioWorklet support Browsers without an AudioWorklet support

    Migration

    There was some pretty major changes in 2.0.0 version, see the migration guide down below.

    Getting started on the web

    While the main script is quite large, there is a loader script provided. Include it in the web/index.html file like this

      <script src="assets/packages/minisound_web/build/minisound_web.loader.js"></script>

    It is highly recommended NOT to make the script defer, as loading may not work properly. Also, it is very small (only 18 lines).

    And at the bottom, at the body’s <script> do like this

                                    // ADD 'async'
    window.addEventListener('load', async function (ev) {
        {{flutter_js}}
        {{flutter_build_config}}
    
        // ADD THIS LINE TO LOAD THE LIBRARY 
        await _minisound.loader.load();
    
        // LEAVE THE REST IN PLACE
        // Download main.dart.js
        _flutter.loader.load({
            serviceWorker: {
                serviceWorkerVersion: {{flutter_service_worker_version}},
            },
            onEntrypointLoaded: function (engineInitializer) {
                engineInitializer.initializeEngine().then(function (appRunner) {
                    appRunner.runApp();
                });
            },
        });
        }
      );

    Minisound depends on SharedArrayBuffer feature, so you should enable cross-origin isolation on your site.

    Usage

    To use this plugin, add minisound as a dependency in your pubspec.yaml file.

    Playback

    // if you are using flutter, use
    import "package:minisound/engine_flutter.dart" as minisound;
    // and with plain dart use
    import "package:minisound/engine.dart" as minisound;
    // the difference is that flutter version allows you to load from assets, which is a concept specific to flutter
    
    void main() async {
      final engine = minisound.Engine();
    
      // engine initialization
      {
        // you can pass `periodMs` as an argument, to change determines the latency (does not affect web). can cause crackles if too low
        await engine.init(); 
    
        // for web: this should be executed after the first user interaction due to browsers' autoplay policy
        await engine.start(); 
      }
    
    
      // there is a base `Sound` interface that is implemented by `LoadedSound` (which reads data from a defined length memory location) 
      final LoadedSound sound;
    
      // sound loading
      {
        // there are also `loadSoundFile` and `loadSound` methods to load sounds from file (by filename) and `TypedData` respectfully
        final sound = await engine.loadSoundAsset("asset/path.ext");
    
        // you can get and set sound's volume (1 by default)
        sound.volume *= 0.5;
      }
    
    
      // playing, pausing and stopping
      {
        sound.play();
    
        await Future.delayed(sound.duration * .5); // waiting while the first half plays
    
        sound.pause(); 
        // when sound is paused, `resume` will continue the sound and `play` will start from the beginning
        sound.resume(); 
    
        sound.stop(); 
      }
    
      
      // looping
      {
        final loopDelay = const Duration(seconds: 1);
    
        sound.playLooped(delay: loopDelay); // sound will be looped with one second period
    
        // btw, sound duration does not account loop delay
        await Future.delayed((sound.duration + loopDelay) * 5); // waiting for sound to loop 5 times (with all the delays)
    
        sound.stop();
      }
    
      // engine and sounds will be automatically disposed when gets garbage-collected
    }

    Generation

    // you may want to read previous example first for more detailed explanation
    
    import "package:minisound/engine_flutter.dart" as minisound;
    
    void main() async {
      final engine = minisound.Engine();
      await engine.init(); 
      await engine.start(); 
    
      // `Sound` is also implemented by a `GeneratedSound` which is extended by `WaveformSound`, `NoiseSound` and `PulseSound` 
    
      // there are four types of a waveform: sine, square, triangle and sawtooth; the type can be changed later
      final WaveformSound wave = engine.genWaveform(WaveformType.sine);
      // and three types of a noise: white, pink and brownian; CANNOT be changed later
      final NoiseSound noise = engine.genNoise(NoiseType.white);
      // pulsewave is basically a square wave with a different ratio between high and low levels (which is represented by the `dutyCycle`)
      final PulseSound pulse = engine.genPulse(dutyCycle: 0.25);
    
      wave.play();
      noise.play();
      pulse.play();
      // generated sounds have no duration, which makes sense if you think about it; for this reason they cannot be looped
      await Future.delayed(const Duration(seconds: 1))
      wave.stop();
      noise.stop();
      pulse.stop();
    }

    Recording

    import "package:minisound/recorder.dart" as minisound;
    
    void main() async {
      // recorder records into memory using the wav format 
      final recorder = minisound.Recorder();
    
      // recording format characteristics can be changed via this function params
      recorder.init();
    
      // just starts the engine
      await recorder.start();
    
      await Future.delayed(const Duration(seconds: 1));
    
      // returns what've been recorded
      final recording = await recorder.stop();
    
      // all data is provided via buffer; sound can be used from it via `engine.loadSound(recording.buffer)`
      print(recording.buffer);
    
      // recordings will be automatically disposed when gets garbage-collected
    }

    Migration guide

    1.6.0 -> 2.0.0

    • Recording and generation APIs got heavily changed. See examples for new usage.

    • Sound autounloading logic got changed, now they depend on the sound object itself, rather than the engine.

      // remove
      // sound.unload();

    As a result, when Sound objects get garbage collected (which may be immediately after or not at the moment they go out of scope), they stop and unload. If you want to prevent this, you are probably doing something wrong, as this means you are creating an indefenetely played sound with no way to access it. Though this behaviour can still be disabled via the doAddToFinalizer parameter to sound loading and generation methods of the Engine class. However, it disables any finalization, so you’ll need to manage Sounds completely yourself. If you believe your usecase is valid, create a github issue and provide the code. Maybe it will change my mind.

    1.4.0 -> 1.6.0

    • The main file (minisound.dart) became engine_flutter.dart.

    // import "package:minisound/minisound.dart";
    // becomes two files
    import "package:minisound/engine_flutter.dart";
    import "package:minisound/engine.dart";

    Building the project

    A Makefile is provided with recipes to build the project and ease development. Type make help to see a list of available commands.

    To manually build the project, follow these steps:

    1. Initialize the submodules:

      git submodule update --init --recursive
    2. Run the following commands to build the project using emcmake:

      emcmake cmake -S ./minisound_ffi/src/ -B ./minisound_web/lib/build/cmake_stuff 
      cmake --build ./minisound_web/lib/build/cmake_stuff 

      If you encounter issues or want to start fresh, clean the build folder and rerun the cmake commands:

      rm -rf *
      emcmake cmake -S ./minisound_ffi/src/ -B ./minisound_web/lib/build/cmake_stuff 
      cmake --build ./minisound_web/lib/build/cmake_stuff 
    3. For development work, it’s useful to run ffigen from the minisound_ffi directory:

      cd ./minisound_ffi/
      dart run ffigen

    TODO

    Visit original content creator repository

  • HAPPI_GWAS_2

    HAPPI_GWAS_2

    The HAPPI_GWAS_2 is a pipeline built for genome-wide association study (GWAS).

    Requirements

    In order to run the HAPPI_GWAS_2, users need to install Miniconda and prepare the Miniconda environment in their
    computing systems.

    Miniconda can be downloaded from https://docs.anaconda.com/free/miniconda/.

    For example, if users plan to install Miniconda3 Linux 64-bit, the wget tool can be used to download the Miniconda.

    wget https://repo.anaconda.com/miniconda/Miniconda3-latest-Linux-x86_64.sh
    

    To install Miniconda in a server or cluster, users can use the command below.

    Please remember to replace the <installation_shell_script> with the actual Miniconda installation shell script. In our
    case, it is Miniconda3-latest-Linux-x86_64.sh.

    Please also remember to replace the <desired_new_directory> with an actual directory absolute path.

    chmod 777 -R <installation_shell_script>
    ./<installation_shell_script> -b -u -p <desired_new_directory>
    rm -rf <installation_shell_script>
    

    After installing Miniconda, initialization of Miniconda for bash shell can be done using the command below.

    Please also remember to replace the <desired_new_directory> with an actual directory absolute path.

    <desired_new_directory>/bin/conda init bash
    

    Installation of the Miniconda is required, and Miniconda environment needs to be activated every time before running the
    HAPPI_GWAS pipeline.

    Write a Conda configuration file (.condarc) before creating a Conda environment:

    nano ~/.condarc
    

    Put the following text into the Conda configuration file (make sure you change envs_dirs and pkgs_dirs) then save
    the file.

    Please make sure not use tab in this yaml file, use 4 spaces instead.

    Please make sure to replace /new/path/to/ with an actual directory absolute path.

    envs_dirs:
        - /new/path/to/miniconda/envs
    pkgs_dirs:
        - /new/path/to/miniconda/pkgs
    channels:
        - conda-forge
        - bioconda
        - defaults
    

    Create a Conda environment named happigwas by specifying all required packages (option 1):

    conda create -n happigwas conda-forge::openjdk=8.0.192 conda-forge::r-base \
    bioconda::vcftools bioconda::htslib conda-forge::pandas conda-forge::statsmodels \
    bioconda::snakemake bioconda::snakemake-executor-plugin-cluster-generic \
    conda-forge::r-devtools conda-forge::r-biocmanager conda-forge::r-argparse \
    conda-forge::r-dplyr conda-forge::r-tidyr conda-forge::r-tibble conda-forge::r-stringr \
    conda-forge::r-ggplot2 conda-forge::r-bh conda-forge::r-mvtnorm conda-forge::r-viridislite \
    conda-forge::r-stringi conda-forge::r-rcpp conda-forge::r-uuid conda-forge::r-nlme \
    conda-forge::r-digest conda-forge::r-matrix conda-forge::r-ape conda-forge::r-bigmemory \
    conda-forge::r-genetics conda-forge::r-gplots conda-forge::r-htmltools \
    conda-forge::r-lattice conda-forge::r-magrittr conda-forge::r-lme4 conda-forge::r-mass \
    bioconda::bioconductor-multtest conda-forge::r-plotly conda-forge::r-rcpparmadillo \
    conda-forge::r-rgl conda-forge::r-gridextra conda-forge::r-scatterplot3d \
    conda-forge::r-snowfall bioconda::bioconductor-snpstats conda-forge::r-biganalytics \
    conda-forge::r-biglm conda-forge::r-car conda-forge::r-foreach conda-forge::r-doparallel
    

    Create a Conda environment named happigwas by using a yaml environment file (option 2):

    conda create --name happigwas --file happigwas-environment.yaml
    

    Create a Conda environment named happigwas by using an explicit specification file (option 3):

    conda create --name happigwas --file happigwas-spec-file.txt
    

    Activate happigwas Conda environment:

    conda activate happigwas
    

    Start R in terminal:

    R
    

    Install required R packages (Do not update any packages if any messages with multiple choices pop-up):

    install.packages("EMMREML", repos = "https://cloud.r-project.org/")
    devtools::install_github('christophergandrud/DataCombine', force=TRUE)
    devtools::install_github("SFUStatgen/LDheatmap", force=TRUE)
    devtools::install_github("jiabowang/GAPIT", force=TRUE)
    

    Quit R:

    q()
    

    Installation

    You can install the HAPPI_GWAS_2 from Github with:

    git clone https://github.com/yenon118/HAPPI_GWAS_2.git
    

    Usage

    The HAPPI_GWAS_2 pipeline is a command line based pipeline that can be ran on any Linux computing systems. It consists
    of BLUP.py for best linear unbiased prediction, BLUE.py for best linear unbiased estimation, and HAPPI_GWAS.py for GWAS,
    haploblock analysis, and candidate gene identification. The command and arguments of each tool are shown as below:

    BLUP.py

    usage: python BLUP.py [-h] -p PROJECT_NAME -w WORKFLOW_PATH -i INPUT_FOLDER -o OUTPUT_FOLDER [-e FEATURE_COLUMN_INDEXES]
                            [--ulimit ULIMIT] [--memory MEMORY] [--threads THREADS]
                            [--keep_going] [--jobs JOBS] [--latency_wait LATENCY_WAIT] [--cluster CLUSTER]
    
    mandatory arguments:
      -p PROJECT_NAME, --project_name PROJECT_NAME
                            Project name
      -w WORKFLOW_PATH, --workflow_path WORKFLOW_PATH
                            Workflow path
      -i INPUT_FOLDER, --input_folder INPUT_FOLDER
                            Input folder
      -o OUTPUT_FOLDER, --output_folder OUTPUT_FOLDER
                            Output folder
    
    optional arguments:
      -h, --help            show this help message and exit
      -e FEATURE_COLUMN_INDEXES, --feature_column_indexes FEATURE_COLUMN_INDEXES
                            Feature column indexes
      --ulimit ULIMIT       Ulimit
      --memory MEMORY       Memory
      --threads THREADS     Threads
      --keep_going          Keep going
      --jobs JOBS           Jobs
      --latency_wait LATENCY_WAIT
                            Latency wait
      --cluster CLUSTER     Cluster parameters
    

    BLUE.py

    usage: python BLUE.py [-h] -p PROJECT_NAME -w WORKFLOW_PATH -i INPUT_FOLDER -o OUTPUT_FOLDER [-e FEATURE_COLUMN_INDEXES]
                            [--ulimit ULIMIT] [--memory MEMORY] [--threads THREADS]
                            [--keep_going] [--jobs JOBS] [--latency_wait LATENCY_WAIT] [--cluster CLUSTER]
    
    mandatory arguments:
      -p PROJECT_NAME, --project_name PROJECT_NAME
                            Project name
      -w WORKFLOW_PATH, --workflow_path WORKFLOW_PATH
                            Workflow path
      -i INPUT_FOLDER, --input_folder INPUT_FOLDER
                            Input folder
      -o OUTPUT_FOLDER, --output_folder OUTPUT_FOLDER
                            Output folder
    
    optional arguments:
      -h, --help            show this help message and exit
      -e FEATURE_COLUMN_INDEXES, --feature_column_indexes FEATURE_COLUMN_INDEXES
                            Feature column indexes
      --ulimit ULIMIT       Ulimit
      --memory MEMORY       Memory
      --threads THREADS     Threads
      --keep_going          Keep going
      --jobs JOBS           Jobs
      --latency_wait LATENCY_WAIT
                            Latency wait
      --cluster CLUSTER     Cluster parameters
    

    HAPPI_GWAS.py

    usage: python3 HAPPI_GWAS.py [-h] -p PROJECT_NAME -w WORKFLOW_PATH -i INPUT_FOLDER -o OUTPUT_FOLDER -v VCF_FILE -g GFF_FILE [--gff_category GFF_CATEGORY] [--gff_key GFF_KEY]
                                    [--genotype_hapmap GENOTYPE_HAPMAP] [--genotype_data GENOTYPE_DATA] [--genotype_map GENOTYPE_MAP]
                                    [--kinship KINSHIP] [--z_matrix Z_MATRIX] [--covariance_matrix COVARIANCE_MATRIX]
                                    [--snp_maf SNP_MAF] [--model MODEL] [--pca_total PCA_TOTAL]
                                    [--ulimit ULIMIT] [--memory MEMORY] [--threads THREADS]
                                    [--keep_going] [--jobs JOBS] [--latency_wait LATENCY_WAIT] [--cluster CLUSTER]
                                    [--p_value_filter P_VALUE_FILTER] [--fdr_corrected_p_value_filter FDR_CORRECTED_P_VALUE_FILTER] [--ld_length LD_LENGTH]
    
    mandatory arguments:
      -p PROJECT_NAME, --project_name PROJECT_NAME
                            Project name
      -w WORKFLOW_PATH, --workflow_path WORKFLOW_PATH
                            Workflow path
      -i INPUT_FOLDER, --input_folder INPUT_FOLDER
                            Input folder
      -o OUTPUT_FOLDER, --output_folder OUTPUT_FOLDER
                            Output folder
      -v VCF_FILE, --vcf_file VCF_FILE
                            VCF file
      -g GFF_FILE, --gff_file GFF_FILE
                            GFF file
    
    optional arguments:
      -h, --help            show this help message and exit
      --gff_category GFF_CATEGORY
                            GFF category
      --gff_key GFF_KEY     GFF key
      --genotype_hapmap GENOTYPE_HAPMAP
                            Genotype hapmap
      --genotype_data GENOTYPE_DATA
                            Genotype data
      --genotype_map GENOTYPE_MAP
                            Genotype map
      --kinship KINSHIP     Kinship matrix file
      --z_matrix Z_MATRIX   Z matrix file
      --covariance_matrix COVARIANCE_MATRIX
                            Covariance matrix file
      --snp_maf SNP_MAF     SNP minor allele frequency
      --model MODEL         Model
      --pca_total PCA_TOTAL
                            Total PCA
      --ulimit ULIMIT       Ulimit
      --memory MEMORY       Memory
      --threads THREADS     Threads
      --keep_going          Keep going
      --jobs JOBS           Jobs
      --latency_wait LATENCY_WAIT
                            Latency wait
      --cluster CLUSTER     Cluster parameters
      --p_value_filter P_VALUE_FILTER
                            P-value filter
      --fdr_corrected_p_value_filter FDR_CORRECTED_P_VALUE_FILTER
                            FDR corrected p-value filter
      --multipletests_method MULTIPLETESTS_METHOD
                            Multipletests method
      --multipletests_p_value_filter MULTIPLETESTS_P_VALUE_FILTER
                            Multipletests corrected p-value filter
      --ld_length LD_LENGTH
                            LD length
    

    HAPPI_GWAS_chromosomewise.py

    In order to use HAPPI_GWAS_chromosomewise.py, the file names or file prefixes of the vcf, genotype hapmap, genotype
    data, genotype map, kinship, and covariance matrix files must be separated by chromosome and named using
    chromosome.

    usage: python3 HAPPI_GWAS_chromosomewise.py [-h] -p PROJECT_NAME -w WORKFLOW_PATH -i INPUT_FOLDER -o OUTPUT_FOLDER -c CHROMOSOME -v VCF_FOLDER -x VCF_FILE_EXTENSION -g GFF_FILE [--gff_category GFF_CATEGORY] [--gff_key GFF_KEY]
                                                    [--genotype_hapmap_folder GENOTYPE_HAPMAP_FOLDER] [--genotype_hapmap_file_extension GENOTYPE_HAPMAP_FILE_EXTENSION] [--genotype_data_folder GENOTYPE_DATA_FOLDER]
                                                    [--genotype_data_file_extension GENOTYPE_DATA_FILE_EXTENSION] [--genotype_map_folder GENOTYPE_MAP_FOLDER] [--genotype_map_file_extension GENOTYPE_MAP_FILE_EXTENSION]
                                                    [--kinship_folder KINSHIP_FOLDER] [--kinship_file_extension KINSHIP_FILE_EXTENSION] [--covariance_matrix_folder COVARIANCE_MATRIX_FOLDER]
                                                    [--covariance_matrix_file_extension COVARIANCE_MATRIX_FILE_EXTENSION] [--snp_maf SNP_MAF] [--model MODEL] [--pca_total PCA_TOTAL] [--ulimit ULIMIT] [--memory MEMORY]
                                                    [--threads THREADS] [--keep_going] [--jobs JOBS] [--latency_wait LATENCY_WAIT] [--cluster CLUSTER] [--p_value_filter P_VALUE_FILTER] [--fdr_corrected_p_value_filter FDR_CORRECTED_P_VALUE_FILTER]
                                                    [--multipletests_method MULTIPLETESTS_METHOD] [--multipletests_p_value_filter MULTIPLETESTS_P_VALUE_FILTER] [--ld_length LD_LENGTH]
    
    mandatory arguments:
      -p PROJECT_NAME, --project_name PROJECT_NAME
                            Project name
      -w WORKFLOW_PATH, --workflow_path WORKFLOW_PATH
                            Workflow path
      -i INPUT_FOLDER, --input_folder INPUT_FOLDER
                            Input folder
      -o OUTPUT_FOLDER, --output_folder OUTPUT_FOLDER
                            Output folder
      -c CHROMOSOME, --chromosome CHROMOSOME
                            Chromosome
      -v VCF_FOLDER, --vcf_folder VCF_FOLDER
                            VCF folder
      -x VCF_FILE_EXTENSION, --vcf_file_extension VCF_FILE_EXTENSION
                            VCF file extension
      -g GFF_FILE, --gff_file GFF_FILE
                            GFF file
    
    optional arguments:
      -h, --help            show this help message and exit
      --gff_category GFF_CATEGORY
                            GFF category
      --gff_key GFF_KEY     GFF key
      --genotype_hapmap_folder GENOTYPE_HAPMAP_FOLDER
                            Genotype hapmap folder
      --genotype_hapmap_file_extension GENOTYPE_HAPMAP_FILE_EXTENSION
                            Genotype hapmap file extension
      --genotype_data_folder GENOTYPE_DATA_FOLDER
                            Genotype data folder
      --genotype_data_file_extension GENOTYPE_DATA_FILE_EXTENSION
                            Genotype data file extension
      --genotype_map_folder GENOTYPE_MAP_FOLDER
                            Genotype map folder
      --genotype_map_file_extension GENOTYPE_MAP_FILE_EXTENSION
                            Genotype map file extension
      --kinship_folder KINSHIP_FOLDER
                            Kinship matrix folder
      --kinship_file_extension KINSHIP_FILE_EXTENSION
                            Kinship matrix file extension
      --covariance_matrix_folder COVARIANCE_MATRIX_FOLDER
                            Covariance matrix folder
      --covariance_matrix_file_extension COVARIANCE_MATRIX_FILE_EXTENSION
                            Covariance matrix file extension
      --snp_maf SNP_MAF     SNP minor allele frequency
      --model MODEL         Model
      --pca_total PCA_TOTAL
                            Total PCA
      --ulimit ULIMIT       Ulimit
      --memory MEMORY       Memory
      --threads THREADS     Threads
      --keep_going          Keep going
      --jobs JOBS           Jobs
      --latency_wait LATENCY_WAIT
                            Latency wait
      --cluster CLUSTER     Cluster parameters
      --p_value_filter P_VALUE_FILTER
                            P-value filter
      --fdr_corrected_p_value_filter FDR_CORRECTED_P_VALUE_FILTER
                            FDR corrected p-value filter
      --multipletests_method MULTIPLETESTS_METHOD
                            Multipletests method
      --multipletests_p_value_filter MULTIPLETESTS_P_VALUE_FILTER
                            Multipletests corrected p-value filter
      --ld_length LD_LENGTH
                            LD length
    

    Examples

    These are a few basic examples which show you how to use the HAPPI_GWAS_2:

    BLUP.py

    cd /path/to/HAPPI_GWAS_2
    
    conda activate happigwas
    
    python BLUP.py -p Test -w /mnt/pixstor/joshitr-lab/chanye/projects/HAPPI_GWAS_2 \
    -i /mnt/pixstor/joshitr-lab/chanye/projects/HAPPI_GWAS_2/data/Arabidopsis360_example_data/original_data_split \
    -o /mnt/pixstor/joshitr-lab/chanye/projects/HAPPI_GWAS_2/output/BLUP_Arabidopsis360
    

    BLUE.py

    cd /path/to/HAPPI_GWAS_2
    
    conda activate happigwas
    
    python BLUE.py -p Test -w /mnt/pixstor/joshitr-lab/chanye/projects/HAPPI_GWAS_2 \
    -i /mnt/pixstor/joshitr-lab/chanye/projects/HAPPI_GWAS_2/data/Arabidopsis360_example_data/original_data_split \
    -o /mnt/pixstor/joshitr-lab/chanye/projects/HAPPI_GWAS_2/output/BLUE_Arabidopsis360
    

    HAPPI_GWAS.py

    cd /path/to/HAPPI_GWAS_2
    
    conda activate happigwas
    
    python3 HAPPI_GWAS.py \
    -p Test \
    -w /mnt/pixstor/joshitr-lab/chanye/projects/HAPPI_GWAS_2 \
    -i /mnt/pixstor/joshitr-lab/chanye/projects/HAPPI_GWAS_2/data/Maize_example_data/raw_data_split \
    -o /mnt/pixstor/joshitr-lab/chanye/projects/HAPPI_GWAS_2/output/HAPPI_GWAS_MLM \
    -v /mnt/pixstor/joshitr-lab/chanye/projects/HAPPI_GWAS_2/data/Maize_example_data/vcf/mdp_genotype_test.vcf.gz \
    -g /mnt/pixstor/joshitr-lab/chanye/projects/HAPPI_GWAS_2/data/Maize_example_data/gff/Zea_mays.AGPv3.26.gff3 \
    --genotype_hapmap /mnt/pixstor/joshitr-lab/chanye/projects/HAPPI_GWAS_2/data/Maize_example_data/genotype_hapmap/mdp_genotype_test.hmp.txt \
    --p_value_filter 0.01
    

    cd /path/to/HAPPI_GWAS_2
    
    conda activate happigwas
    
    python3 HAPPI_GWAS.py \
    -p Test \
    -w /mnt/pixstor/joshitr-lab/chanye/projects/HAPPI_GWAS_2 \
    -i /mnt/pixstor/joshitr-lab/chanye/projects/HAPPI_GWAS_2/data/Maize_example_data/raw_data_split \
    -o /mnt/pixstor/joshitr-lab/chanye/projects/HAPPI_GWAS_2/output/HAPPI_GWAS_MLM \
    -v /mnt/pixstor/joshitr-lab/chanye/projects/HAPPI_GWAS_2/data/Maize_example_data/vcf/mdp_genotype_test.vcf.gz \
    -g /mnt/pixstor/joshitr-lab/chanye/projects/HAPPI_GWAS_2/data/Maize_example_data/gff/Zea_mays.AGPv3.26.gff3 \
    --genotype_data /mnt/pixstor/joshitr-lab/chanye/projects/HAPPI_GWAS_2/data/Maize_example_data/genotype_data/mdp_numeric.txt \
    --genotype_map /mnt/pixstor/joshitr-lab/chanye/projects/HAPPI_GWAS_2/data/Maize_example_data/genotype_map/mdp_SNP_information.txt \
    --p_value_filter 0.01
    

    cd /path/to/HAPPI_GWAS_2
    
    conda activate happigwas
    
    python3 HAPPI_GWAS.py \
    -p Test \
    -w /mnt/pixstor/joshitr-lab/chanye/projects/HAPPI_GWAS_2 \
    -i /mnt/pixstor/joshitr-lab/chanye/projects/HAPPI_GWAS_2/data/Maize_example_data/raw_data_split \
    -o /mnt/pixstor/joshitr-lab/chanye/projects/HAPPI_GWAS_2/output/HAPPI_GWAS_MLMM \
    -v /mnt/pixstor/joshitr-lab/chanye/projects/HAPPI_GWAS_2/data/Maize_example_data/vcf/mdp_genotype_test.vcf.gz \
    -g /mnt/pixstor/joshitr-lab/chanye/projects/HAPPI_GWAS_2/data/Maize_example_data/gff/Zea_mays.AGPv3.26.gff3 \
    --genotype_hapmap /mnt/pixstor/joshitr-lab/chanye/projects/HAPPI_GWAS_2/data/Maize_example_data/genotype_hapmap/mdp_genotype_test.hmp.txt \
    --model MLMM \
    --p_value_filter 0.01
    

    cd /path/to/HAPPI_GWAS_2
    
    conda activate happigwas
    
    python3 HAPPI_GWAS.py \
    -p Test \
    -w /mnt/pixstor/joshitr-lab/chanye/projects/HAPPI_GWAS_2 \
    -i /mnt/pixstor/joshitr-lab/chanye/projects/HAPPI_GWAS_2/data/Maize_example_data/raw_data_split \
    -o /mnt/pixstor/joshitr-lab/chanye/projects/HAPPI_GWAS_2/output/HAPPI_GWAS_FarmCPU \
    -v /mnt/pixstor/joshitr-lab/chanye/projects/HAPPI_GWAS_2/data/Maize_example_data/vcf/mdp_genotype_test.vcf.gz \
    -g /mnt/pixstor/joshitr-lab/chanye/projects/HAPPI_GWAS_2/data/Maize_example_data/gff/Zea_mays.AGPv3.26.gff3 \
    --genotype_hapmap /mnt/pixstor/joshitr-lab/chanye/projects/HAPPI_GWAS_2/data/Maize_example_data/genotype_hapmap/mdp_genotype_test.hmp.txt \
    --model FarmCPU \
    --p_value_filter 0.01 \
    --cluster "sbatch --account=joshitr-lab --cpus-per-task=3 --time=0-02:00 --partition=interactive,general,requeue,gpu,joshitr-lab,xudong-lab --mem=64G --output=log_2023_06_15_r_gapit_\%A-\%a.out"
    

    cd /path/to/HAPPI_GWAS_2
    
    conda activate happigwas
    
    python3 HAPPI_GWAS_chromosomewise.py \
    -p Test \
    -w /mnt/pixstor/joshitr-lab/chanye/projects/HAPPI_GWAS_2 \
    -i /mnt/pixstor/joshitr-lab/chanye/projects/HAPPI_GWAS_2/data/Maize_example_data/raw_data_split \
    -o /mnt/pixstor/joshitr-lab/chanye/projects/HAPPI_GWAS_2/output/HAPPI_GWAS_MLM_chromosomewise \
    -c 1 \
    -c 2 \
    -c 3 \
    -c 4 \
    -c 5 \
    -c 6 \
    -c 7 \
    -c 8 \
    -c 9 \
    -c 10 \
    -v /mnt/pixstor/joshitr-lab/chanye/projects/HAPPI_GWAS_2/data/Maize_example_data/vcf_chromosomewise/ \
    -x ".vcf.gz" \
    -g /mnt/pixstor/joshitr-lab/chanye/projects/HAPPI_GWAS_2/data/Maize_example_data/gff/Zea_mays.AGPv3.26.gff3 \
    --genotype_hapmap_folder /mnt/pixstor/joshitr-lab/chanye/projects/HAPPI_GWAS_2/data/Maize_example_data/genotype_hapmap_chromosomewise/ \
    --genotype_hapmap_file_extension ".hmp.txt" \
    --keep_going \
    --p_value_filter 0.01
    

    Remarks

    1. The execution time of the HAPPI_GWAS_2 pipeline mainly depends on the size of the data and the available computing
      resources on the machine.

    Visit original content creator repository