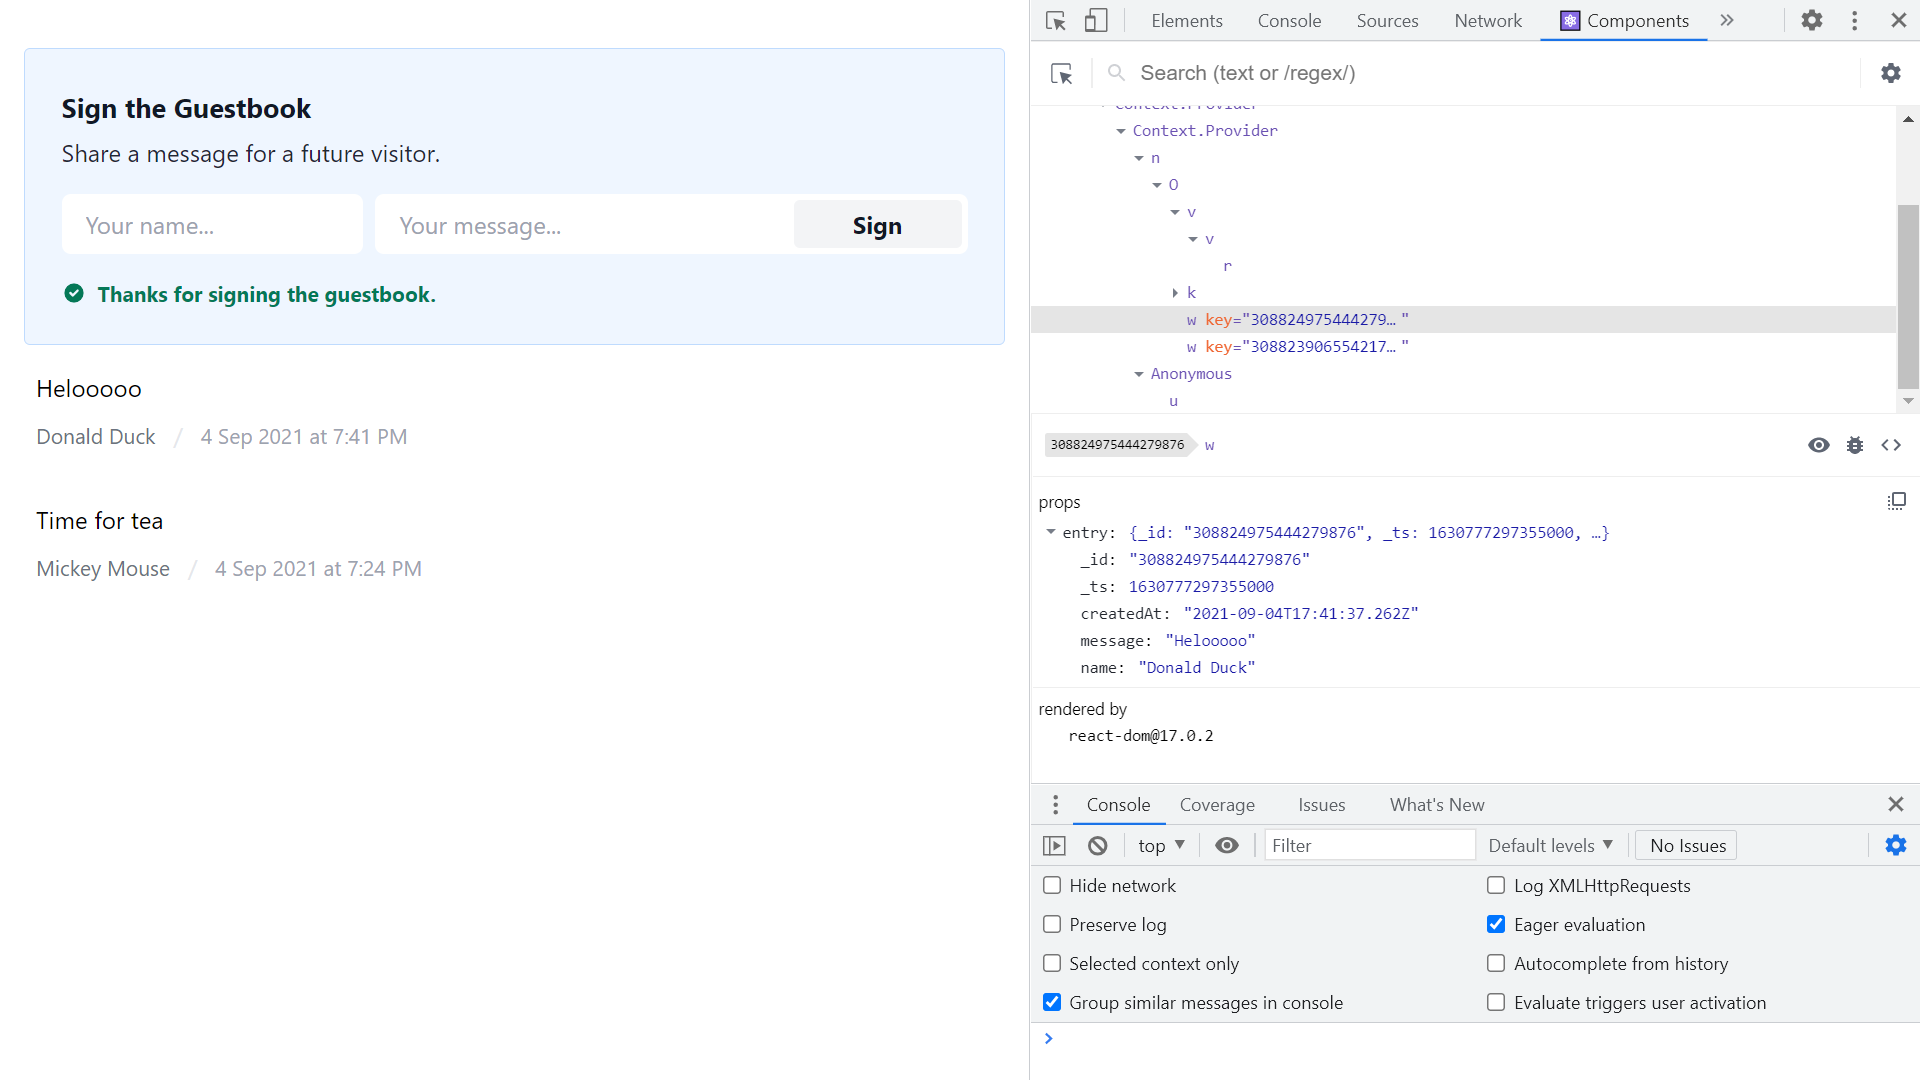
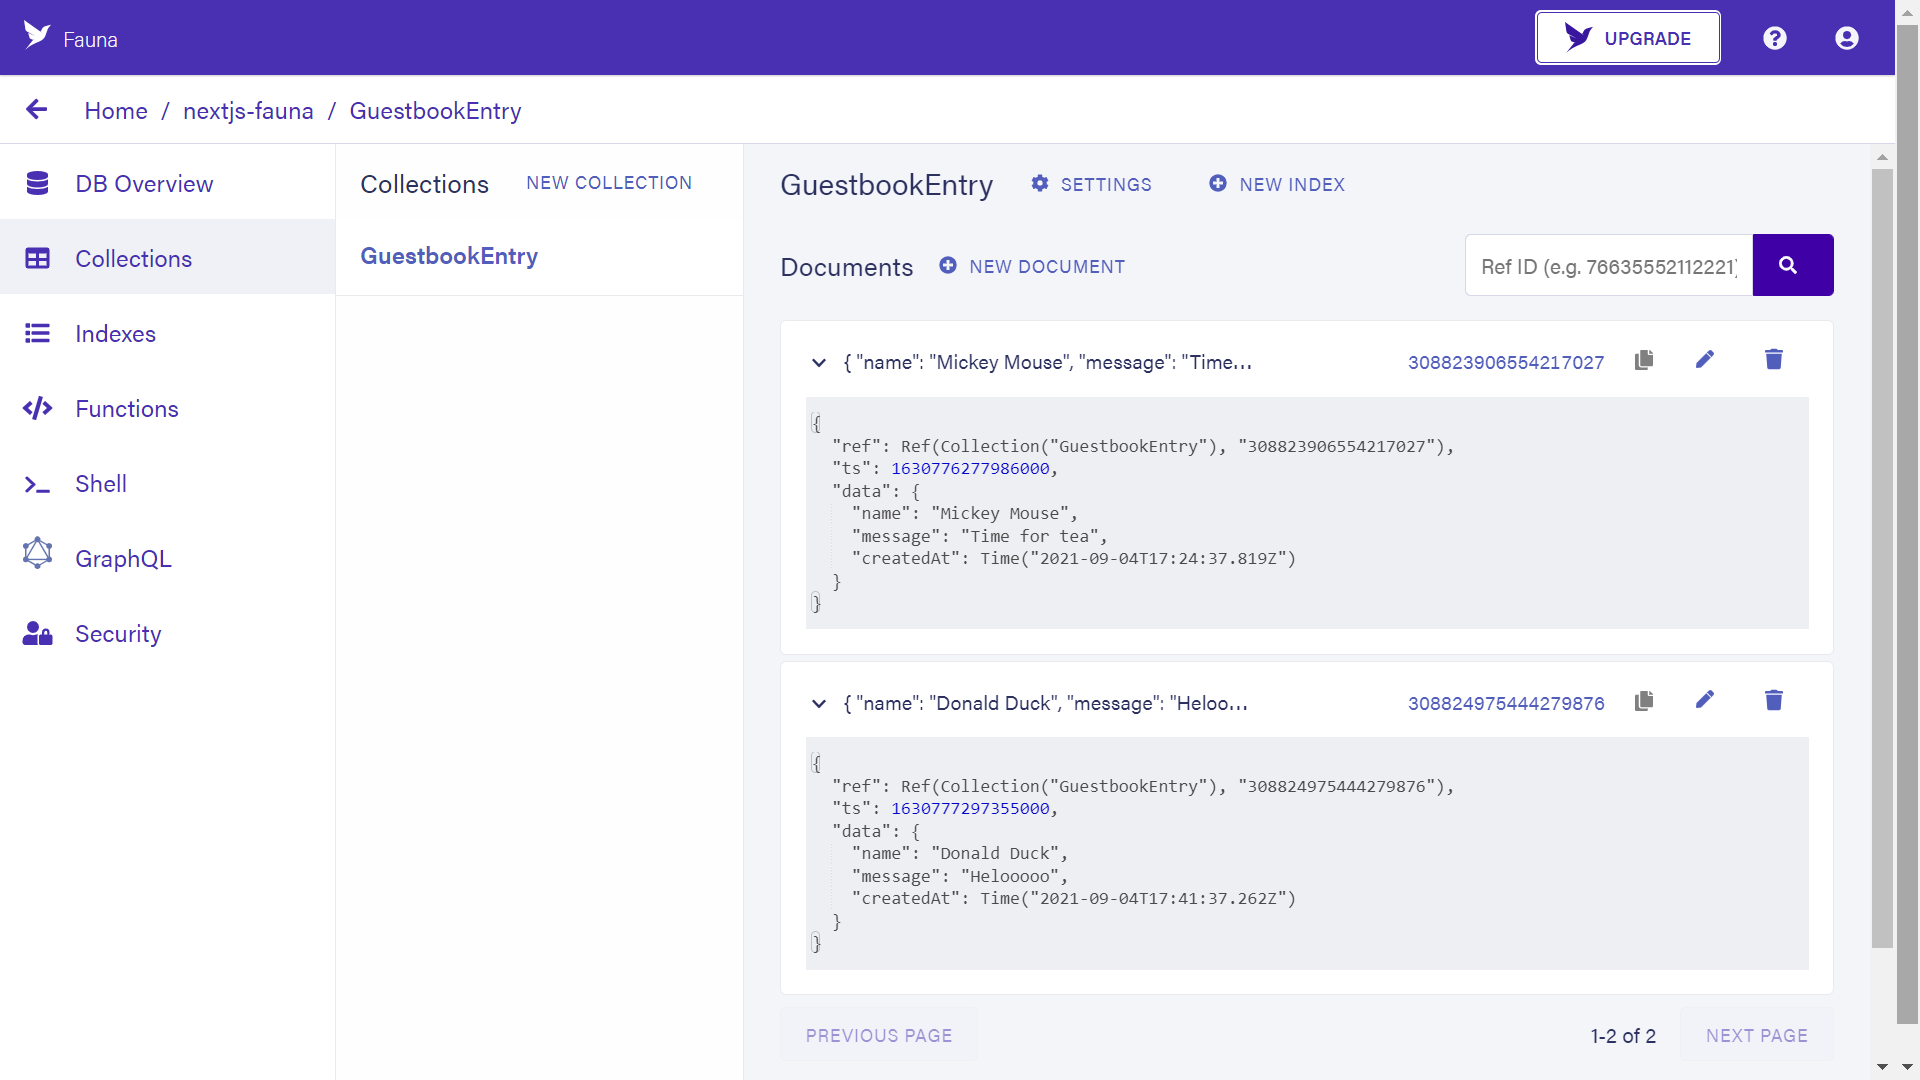
Hold My Code is a web based app where in which a user can write and save code snippets and notes with javascript highlighting. The application works online as well as offline and can be installed as a browser application.
Permission is hereby granted, free of charge, to any person obtaining a copy
of this software and associated documentation files (the “Software”), to deal
in the Software without restriction, including without limitation the rights
to use, copy, modify, merge, publish, distribute, sublicense, and/or sell
copies of the Software, and to permit persons to whom the Software is
furnished to do so, subject to the following conditions:
The above copyright notice and this permission notice shall be included in all
copies or substantial portions of the Software.
THE SOFTWARE IS PROVIDED “AS IS”, WITHOUT WARRANTY OF ANY KIND, EXPRESS OR
IMPLIED, INCLUDING BUT NOT LIMITED TO THE WARRANTIES OF MERCHANTABILITY,
FITNESS FOR A PARTICULAR PURPOSE AND NONINFRINGEMENT. IN NO EVENT SHALL THE
AUTHORS OR COPYRIGHT HOLDERS BE LIABLE FOR ANY CLAIM, DAMAGES OR OTHER
LIABILITY, WHETHER IN AN ACTION OF CONTRACT, TORT OR OTHERWISE, ARISING FROM,
OUT OF OR IN CONNECTION WITH THE SOFTWARE OR THE USE OR OTHER DEALINGS IN THE
SOFTWARE.
Neurthino.jl is a package for calculating neutrino oscillation probabilities.
The main focus of the package lies on atmospheric neutrino flux and the neutrino
propagation through earth.
Basic Usage
First of all the basic vacuum properties have to be defined by creating a
OscillationParameters struct with fixed number of neutrino flavours of the
considered model:
The probabilities are calculated based on the transition matrix
(the so-called PMNS-Matrix) between flavour and mass eigenstates,
as well as the Hamiltonian in the mass eigenbasis. In order to calculating these
just once, the Pνν function can be utilised in the following way:
For homogeneous matter with a fixed density, a modified PMNS-Matrix
and Hamiltonian can be determined and passed into Pνν, just like for
oscillations in vacuum. In order to determine the modified PMNS-Matrix and
Hamiltonian the neutrino energy and the matter density are required:
The second option is suitable for scenarios with more complex paths with
sections of different densities. An example is shown in the next chapter, where
we propagate neutrinos through the earth.
Neutrino Propagation through the Earth
The Neurthino.jl package also includes features for the neutrino oscillation probabilities
through the Earth, i.e. it contains functions for generating a neutrino path based on the
PREM model. In the following example a neutrino oscillogram with a resolution of 200×200 bins
is determined. The zenith angles for up going neutrinos (cos(θ)ϵ[-1,0]) and
subsequently the neutrino paths are generated first:
The detector is assumed to be 2.5km under the earth’s surface (a typical KM3NeT
detector block in the Mediterranean), which is a realistic scenario for
Water-Cherenkov-Detectors in sea or ice. Each path consists of 100 sections of
equal lengths while the matter density is taken from the PREM model.
If a vector of densities is passed as discrete_densities, the values are
clipped to the closest value.
The returned array prob is again of type AxisArray with an axis Path for the path index (instead of the Baseline axis).
P(νe→νe) is determined by prob[InitFlav=Electron, FinalFlav=Electron], which can be visualised by a heatmap:
and for P(νμ→νμ) or prob[InitFlav=Muon, FinalFlav=Muon]:
Projeto cuja função é recuperar dados de um arquivo txt e criar e inserir os dados recuperados em um arquivo xlsx
Resumo:
Por questões práticas e tecnológicas diversas pessoas, principalmente em ambiente organizacional optam por fazerem relatórios e planilhas digitalizados por computadores para assim acessá-los e apresentá-los de forma mais eficiente.
Assim sendo, a fim de facilitar a vida de um colaborador da área da psicologia que tem a função de fazer um relatório em um arquivo de texto sobre seus pacientes e, após, passar os dados desse relatório em forma de planilha. Desenvolvi um programa que acessa este arquivo na extensão “.txt” e recupera as informações deste arquivo (nome, quantidade de sessões no mês e convênio), calcula o total a receber de cada cliente levando em consideração a quantidade de consultas com o quanto o convênio do respectivo cliente paga.
O programa foi escrito em Python com o auxílio da biblioteca openpyxl, usada para que o Python possa interagir com arquivos gerados pela ferramenta de edição e criação de planilhas Microsoft Excel (arquivos de extensão “.xls” e “.xlsx”). O diretório conta com o script app.py e duas pastas, documentos (onde os documentos de extensão “.txt” ficam) e planilhas (onde o programa app.py salva as planilhas criadas)
Funções do script:
main():
Função principal, faz um loop enquanto interage com o usuário para receber o nome do relatório para recuperar os dados e o mês referente à planilha além de chamar as demais funções para criar, inserir os dados e formatar a planilha.
txt(arq):
Função que recebe o nome do arquivo de texto inserido pelo usuário; verifica se foi adicionado a extensão, caso não, adiciona a extenção”.txt”.
usaDoc(documento):
Função que recebe o nome do documento; abre o documento; separa os registros; verifica para cada registro, para cada linha do registro se possui algum dos dados necessários, caso a linha tenha a função chamará outra função que garimpa apenas o valor necessário; retorna um dicionário contendo todos dados dos registros.
precoConvenio(convenio,qtd):
Função que recebe o nome do convênio do registro e a quantidade de seções; verifica o convênio e retorna o resultado do preço por seção multiplicado pela quantidade.
pegaQtd(frase):
Função que recebe a linha onde o valor referente à quantidade se encontra e retorna apenas este valor.
pegaNome(frase):
Função que recebe a linha onde o valor referente ao nome se encontra e retorna apenas este valor.
repetido(lista,nome):
Função que recebe uma lista de dicionários e um nome; a função irá verificar se o nome pertence a algum dicionário da lista e, caso sim: irá retornar uma lista com o booleano verdadeiro e o índice do dicionário onde está o nome, caso não: será retornado uma lista com falso e o número -1.
criaPlan(arq,mes):
Função que recebe o nome do arquivo texto e o mês referente à planilha; cria a planilha; chama as funções que adicionam e estiliza os registros e salva o arquivo com extensão “.xlsx”.
addPessoas
(pessoas, plan, linhaInicial): Função que recebe uma lista de dicionários que contêm os dados das pessoas, a planilha em que serão inseridos os dados e a linha de onde o programa iniciará a adicionar; adiciona os registros e seus valores na planilha.
estiliza(planilha,celulas,estilo):
Função que recebe a planilha que irá modificar, uma lista com as células e um inteiro que indica o tipo de estilo; caso estilo seja igual a 1, a função irá estilizar as células como células de título; caso estilo seja igual a 2, as células serão formatadas como células de valores.
Requisitos para rodar o código:
Linguagem Python
Biblioteca openpyxl
Recomendo que use uma versão recente do python para evitar erros. A versão que usei foi a 3.8
Para instalar o Python em seu computador,acesse o link abaixo para abrir o site oficial da linguagem onde pode-se consultar informações sobre a instalação:
https://www.python.org
Para instalar o openpyxl cole o seguinte código na linha de comando do seu computador:
pip install openpyxl
Para mais informações sobre a biblioteca acesse a documentação disponível em:
https://openpyxl.readthedocs.io/
Como rodar o código:
Selecione a pasta que deseja baixar o projeto, abra a interface de linha de comando do Git e cole o seguinte código para clonar o projeto:
The proper way to create WASM browser service workers.
This crate provides rust library and JS glue code allowing to wrap POSIX compatible code into WASM/WASI target to be able to run in the browser service worker. It also provides imput/output message channel with main web application.
Why WASI?
WebAssembly System Interfaces (WASI) is an exciting new specification that allows running POSIX-like applications anywhere, safely and securely with WebAssembly. -> Medium / Running WASI in Javascript with Wasmer-JS
POSIX-compatible applications compiled to WASI can now also run in browser, think of code-reuse and delegating server workload to client side. On top of that it appears code compiled to wasm32-wasi target is executing about 2 times faster than code compiled to other wasm32 targets with web bindings, CPU intensive workloads can now execute with performance close to native targets (try http://wabench.com:8080).
Why might I need wasi-worker?
WASI target allows to compile many crates which are using standard library, except threads and networking which is not supported yet. The only problem is that WASI is not built to be executed from browser, rather it is standard which aims to run WASM code on server side. Leveraging @wasmer/wasi this crate provides browser service worker WASI runtime as well as communication bridge to/from web application.
Another possible reason is WASM code which executes as part of web application occupies same javascript thread, hence if wasm code is running complex calculations it will block browser application while working. To make it working in separate thread we can employ browser service workers.
use wasi_worker::*;structMyWorker;implHandlerforMyWorker{fnon_message(&self,msg:&[u8]) -> std::io::Result<()>{println!("My Worker got message: {:?}", msg);Ok(())}}fnmain(){// JS glue code will hook to /output.binServiceWorker::initialize(ServiceOptions::default());ServiceWorker::set_message_handler(Box::new(MyWorker{}));// Send binary message to main browser applicationServiceWorker::post_message(b"message");}
JavaScript WASI bindings
JavaScript WASI bindings are built on top of @wasmer libraries can be easily deployed with wasiworker tool:
cargo install wasi-worker-cli
wasiworker install will add sample worker code and bin target to current crate directory:
wasiworker install
wasiworker deploy will build worker bin target and deploy it with JS glue code under ./dist:
use wasi_worker::*;structMyWorker{}implHandlerforMyWorker{fnon_message(&self,msg:&[u8]) -> std::io::Result<()>{// Process incoming messageprintln!("My Worker got message: {:?}", msg);Ok(())}}fnmain(){// In WASI setup output will go to /output.bin#[cfg(target_os="wasi")]let opt = ServiceOptions::default();// In user filesystem we operate under current dir#[cfg(not(target_os="wasi"))]let opt = ServiceOptions{output:FileOptions::File("./testdata/output.bin".to_string())};let output_file = match&opt.output{FileOptions::File(path) => path.clone()};ServiceWorker::initialize(opt).expect("ServiceWorker::initialize");// Attach Agent to ServiceWorker as message handler singletonServiceWorker::set_message_handler(Box::new(MyWorker{}));// Send binary message to main browser application// this requires JS glue see wasi-worker-cliServiceWorker::post_message(b"message").expect("ServiceWorker::post_message");// It does not autodelete output file
std::fs::remove_file(output_file).expect("Remove output.bin");}
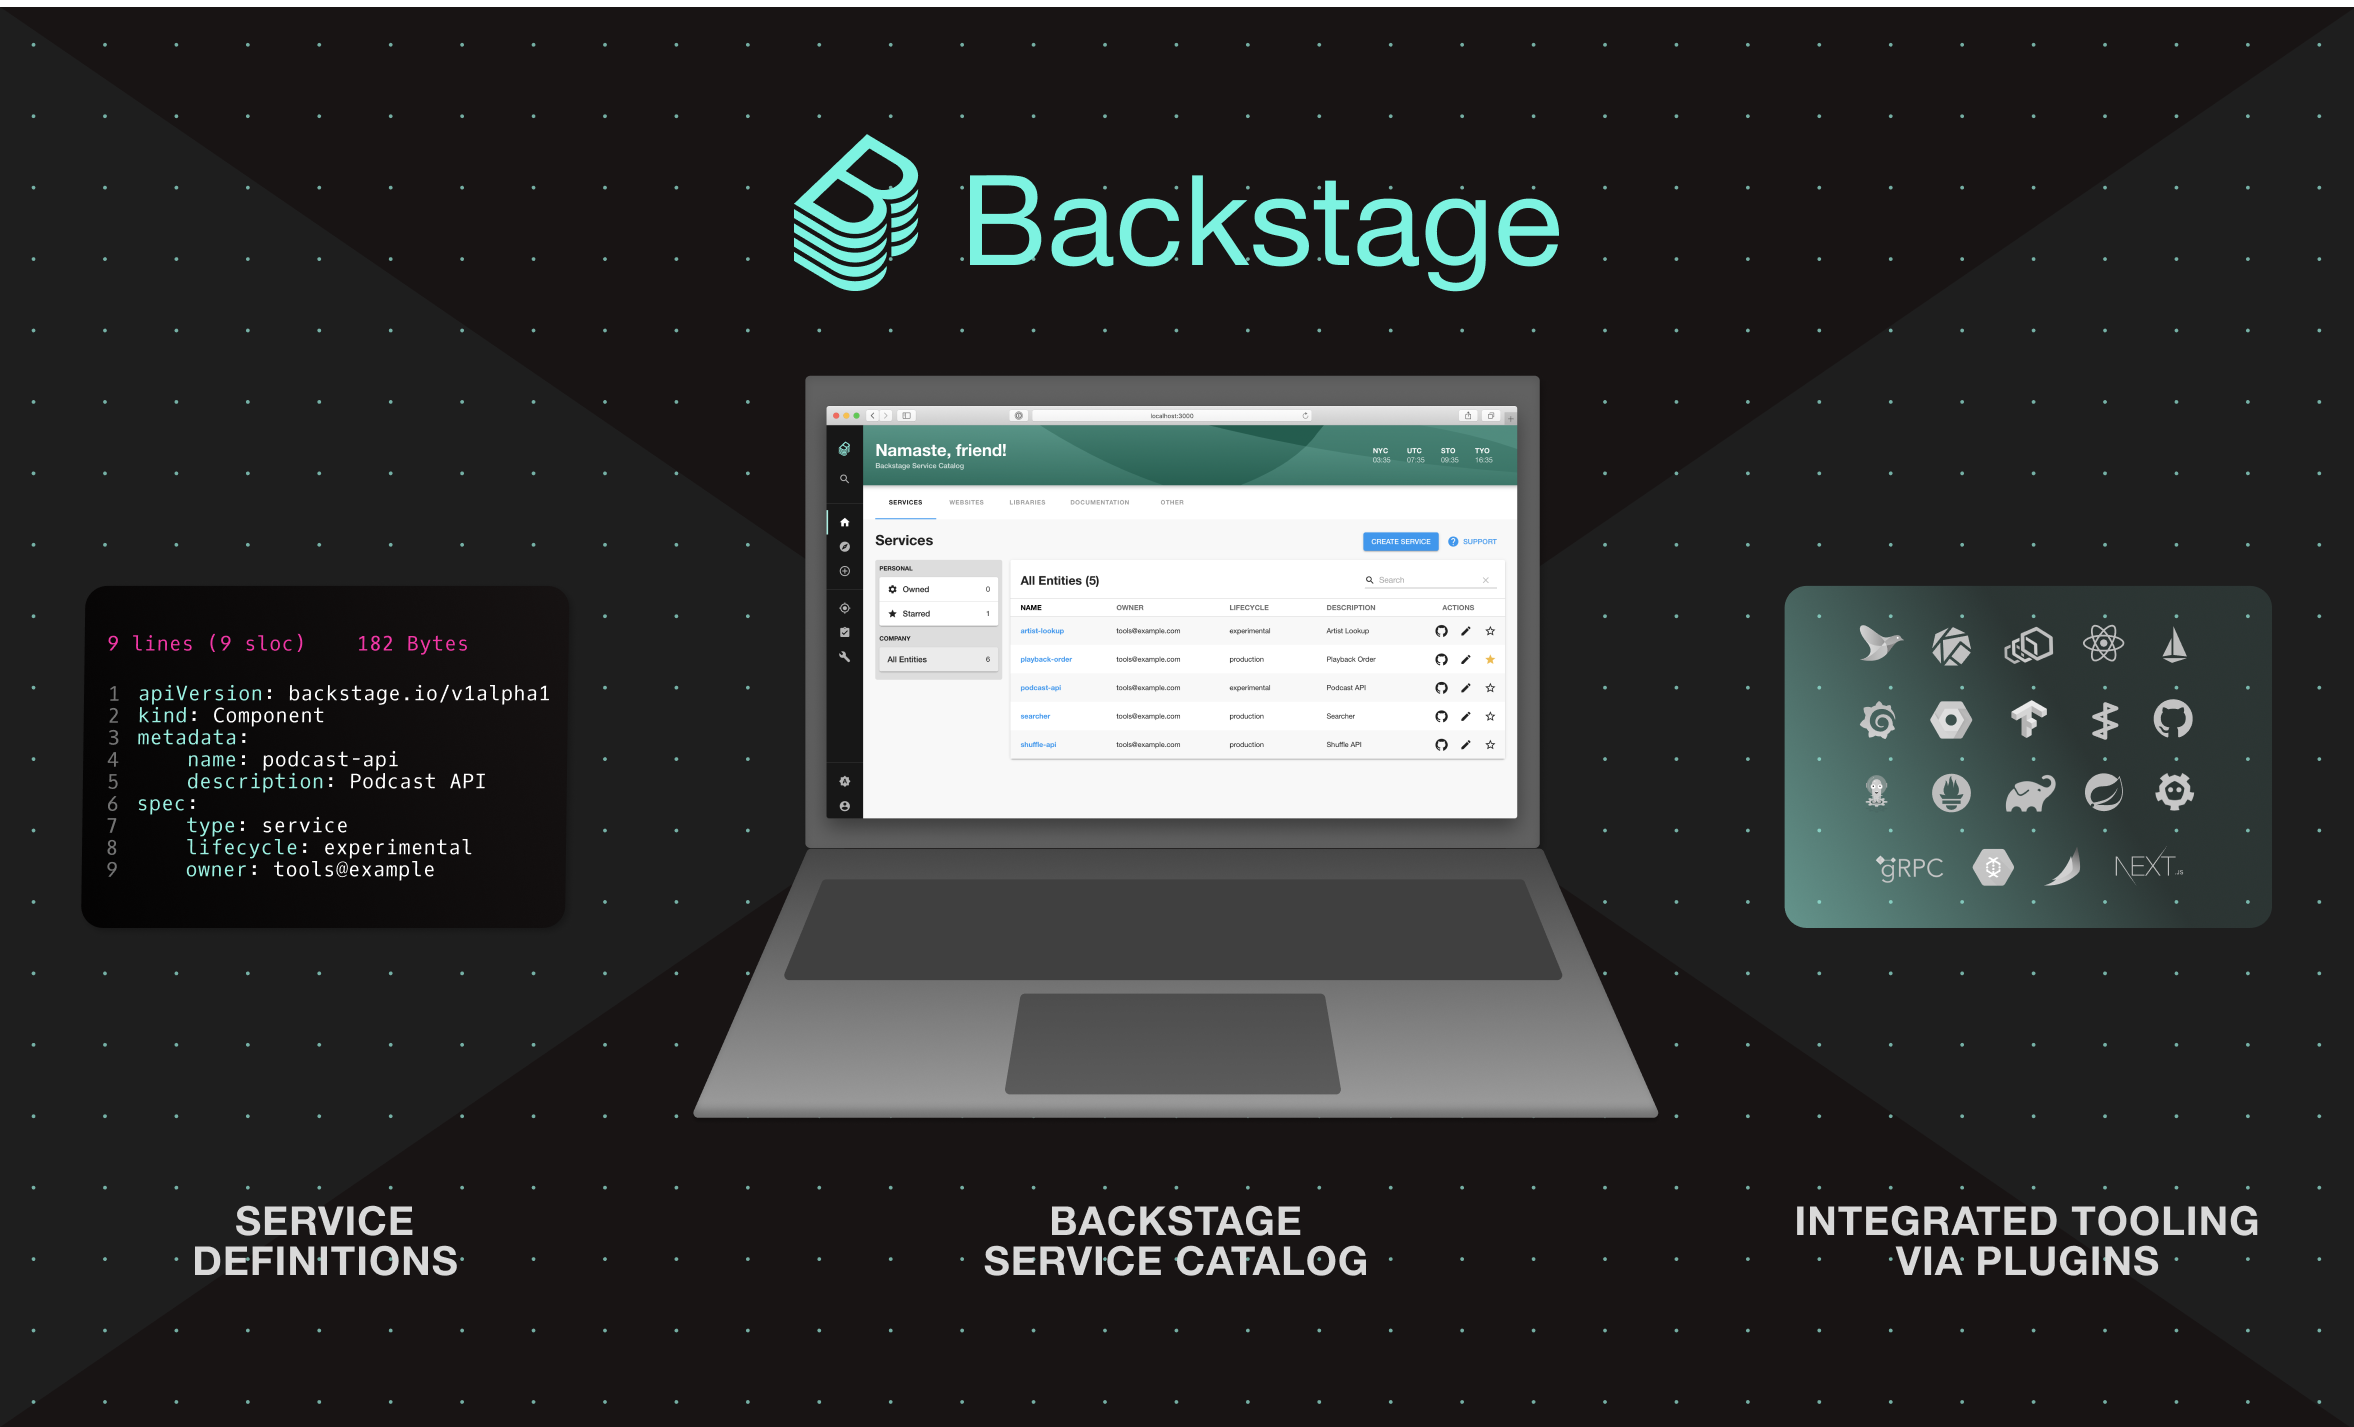
Backstage is an open source framework for building developer portals. Powered by a centralized software catalog, Backstage restores order to your microservices and infrastructure and enables your product teams to ship high-quality code quickly without compromising autonomy.
Backstage unifies all your infrastructure tooling, services, and documentation to create a streamlined development environment from end to end.
Out of the box, Backstage includes:
Backstage Software Catalog for managing all your software such as microservices, libraries, data pipelines, websites, and ML models
Backstage Software Templates for quickly spinning up new projects and standardizing your tooling with your organization’s best practices
Backstage TechDocs for making it easy to create, maintain, find, and use technical documentation, using a “docs like code” approach
Plus, a growing ecosystem of open source plugins that further expand Backstage’s customizability and functionality
skip training RCNN on imagenet and directly train on region proposals from AFLW dataset
Copy weights to the hyperface model and retrain it on AFLW dataset
Implement HyperFace-ResNet101
Uses keras.application to load model weights and retrain R-CNN
Re-write the model architecture for resnet and carry out training
Experimental stuff
Find better loss functions/ Implement custom loss functions
Find better optimizer
Decide on using ReduceLROnPlateau or not, look for useful callbacks
Future Plans
Implement using ResNet
Divide the code into seperate files
support command line arguments
Known issues
openCV’s imread function reads in BGR instead of RGB, skimage ioread is comparatively slower than openCV, matplotlib shows wrong image plots because of BGR mode
Some images are bw by default so proper dimension conversion can not be done at all images (at the moment those images are skipped to save me from headache)
Processing all images uses up 14gb+ of RAM, so try and implement some other way because I plan on implementing data augementation in future to increase face detection accuracy
No official keras implementation of ResNet101, this code relies on experimental code(ro be changed in next version update)
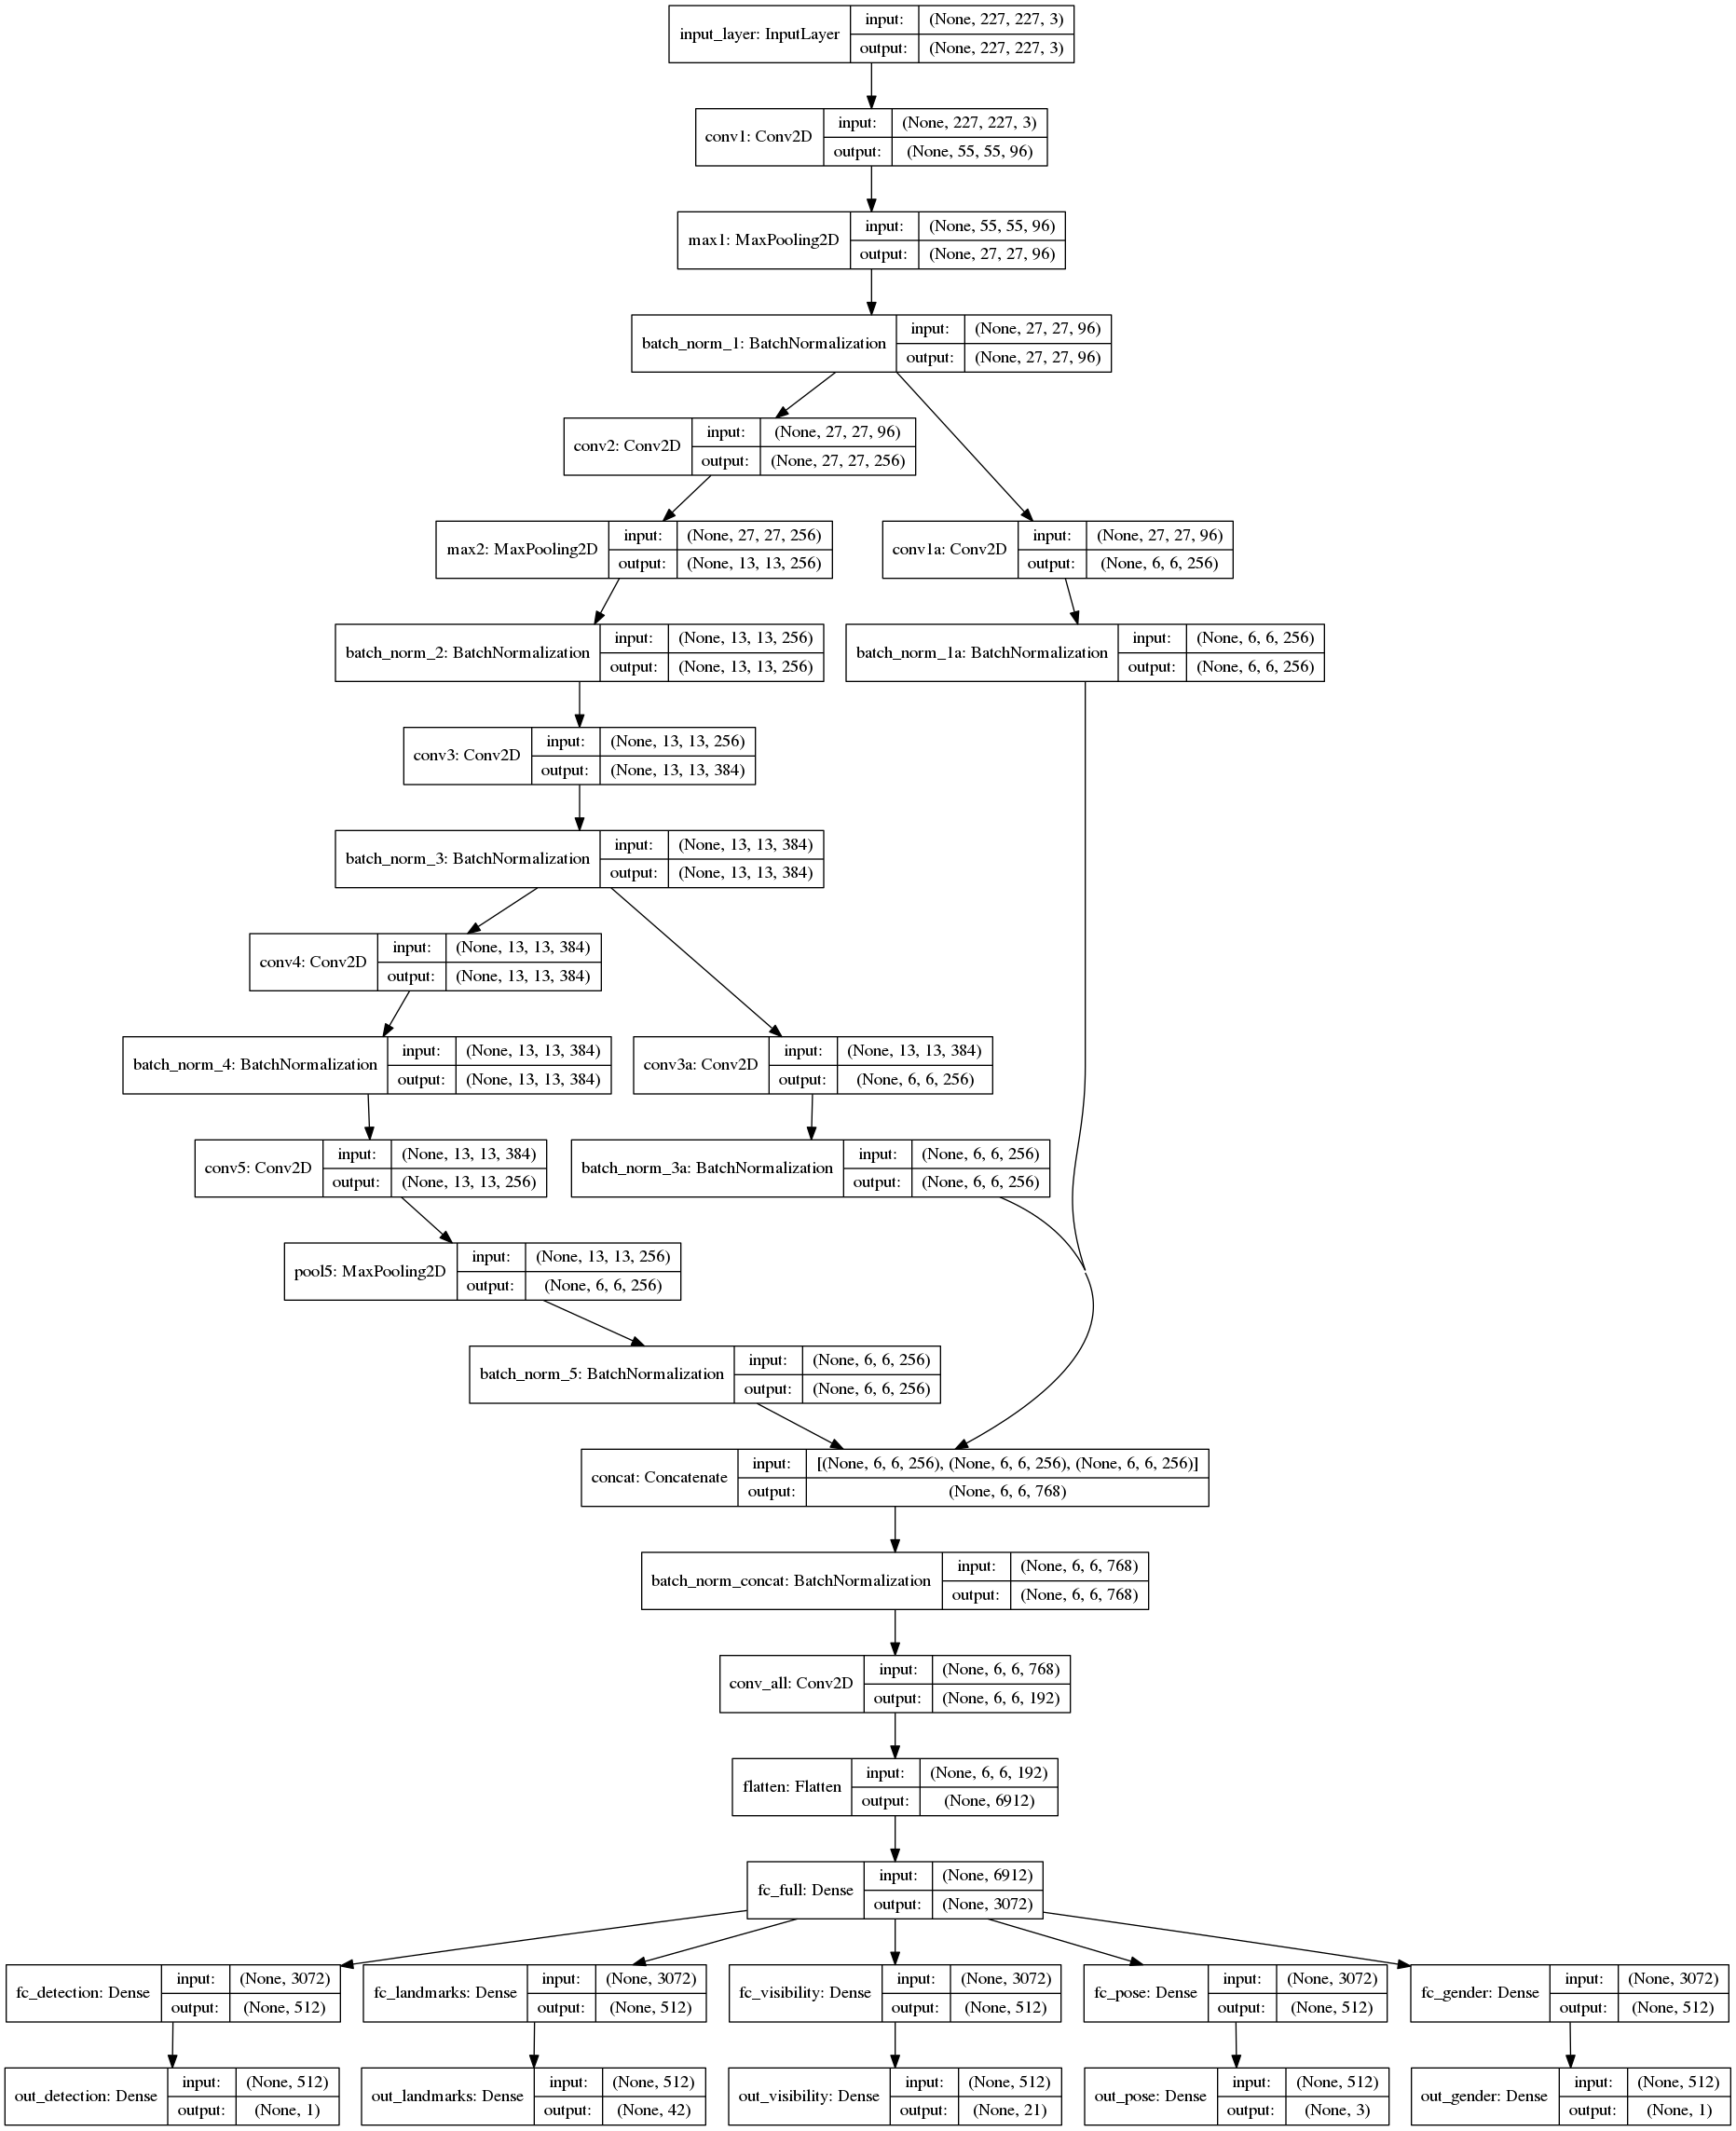
Current model archietecture (AlexNet) is shown below –


 https://github.com/Robdom87/Hold-My-Code